
I have recently modified this using terminology others may find helpful when being instructed on how DNS works.
Edit: most likely moving info to another service. Too many issues with github and too many pretentious people when asking for help.
An additional note to the original post.
==========================================
With the ever growing security risks imposed by DNS poisoning and bad domains out there, it is very beneficial from a security standpoint to run and maintain your own DNS and DNS blacklist. This can help prevent tracking and redirects to malicious domains such as scareware or c2 servers that resolve to domain names.
Addition: With cloud hosting being the norm, it is more beneficial to block via domain instead of an IP address. What was once a malicious domain today is Gmail tomorrow. A good resource to test this is `https://www.threatminer.org/index.php `
Pi-hole as All-Around DNS Solution
Pi-hole is a tool used to prevent netowrk traffic from traversing to domains you specify. This mainly consists of advertisement and tracking domains, by default.
Furthermore, from the point of an attacker, the DNS servers of larger providers are very worthwhile targets, as they only need to poison one DNS server, but millions of users might be affected.
When you operate your own ecursive DNS server, then the likeliness of getting affected by such an attack is greatly reduced. This makes me stress the importance of not having your DNS server publicly visible. An example would be port forwarding. You should never port forward port 53. There is not real reason to ever have to perform this function. This creates a large attack surface for your network and makes you a target.
What is a recursive DNS server?This can be referred to as a local resolver. The usual path is as follows:
Your system > local resolver > Root server > TLD(Top Level Domain Server) > Authoratative server
A recursive server is usually your ISP's DNS server. It is what your system contacts for DNS information. Most users change this to google's 8.8.8.8 without knowing why.
When you try to go to a domain like github_com, your system will check its local cache to determine if it has IP information for the domain name. If it does not, it will contact whatever it has set to its local resolver.
If the local resolver has it cached, it will provide your system with that information. If it is not cached, the local resolver will then contact a root DNS server to determine the next server to contact.
Your local resolver will then contact the top level domain server provided by the root server. The TLD will then direct your local resolver to the proper authoratative server for the domain.
Your local resolver will contact the authoratative server and then be provided with the IP information. Your local resolver will provide your system with the IP address of the web server's(github_com) IP address.
Your local resolver will then cache that data for a specific amount of time. Your system may also cache this information.
seems confusing. It is why i provided the visual above the paragraph. A more specific step by step one below.
Your system > local resolver
local resolver > root server provides an answer to a TLD
local resolver > TLD which provides Authoratative server information
local resolver > Authoratative which provides IP address information
local resolver > Your system
Graphic edited. From cloudflare.
![DNS_IMAGE] (https://i.imgur.com/LohDSeF.png)

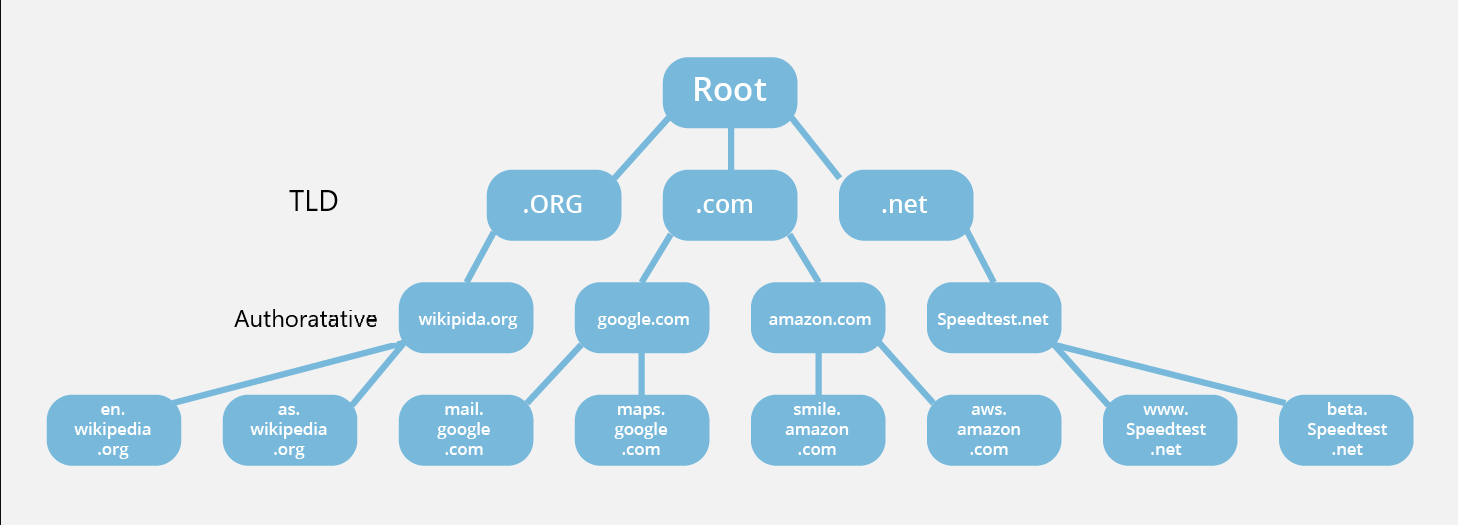

"as you can see the images arent working so dont be suprised if this is all hosted somewhere easier. like gitlab."
What does this guide provide?
This guide provides instructions on how to setup your own local resolver using the device you already use for the Pi-Hole software. If you are starting fresh, I find starting with unbound before installing Pi-Hole is easier.
This guide assumes a fairly recent Debian/Ubuntu based system and will use the maintainer provided packages for installation to make it an incredibly simple process. It assumes only very basic knowledge of how DNS works.
A standard Pi-hole installation will do it as follows:
Your client asks the Pi-hole Who is github_com?
Your Pi-hole will check its cache and reply if the answer is already known.(which could include the block result)
Your Pi-hole will check the blocking lists and reply if the domain is blocked.(if unknown and not cahced)
Since neither 2. nor 3. is true in our example, the Pi-hole forwards the request to the configured external upstream DNS server(s).
Upon receiving the answer, your Pi-hole will reply to your client and tell it the answer of its request.
Lastly, your Pi-hole will save the answer in its cache to be able to respond faster if any of your clients queries the same domain again.
After you set up your Pi-hole as described in this guide, this procedure changes notably:
Having a local resolver works like talked about before, but having Pi-Hole installed adds a few steps talked about directly above this line.
Benefit: Privacy - as you're directly contacting the recursive server, no server can fully log the exact paths you're going, as e.g. the Google DNS servers will only be asked if you want to visit a Google website, but not if you visit the website of your favorite newspaper, etc. Remember, as the whole path to the authoratative server is not encrypted, Your ISP can still observe this traffic if they chose to do so.
Hiring personnel to do this is unfeasable, but with the advent of better AI platforms, it will get easier for them to do so if they so choose.
Drawback: Traversing the path may be slow, especially for the first time you visit a website. By slow, I mean usually around one second instead of a few miliseconds. Most commonly used sites are cached in several locations.
Setting up Pi-hole as a recursive DNS server solution
We will use unbound, a secure open source recursive DNS server primarily developed by NLnet Labs, VeriSign Inc., Nominet, and Kirei. The first thing you need to do is to install the recursive DNS resolver:
sudo apt install unbound
#Important: Download the current root hints file (the list of primary root servers which are serving the domain "." - the root domain). Update it roughly every six months. Note that this file changes infrequently.
wget -O root.hints https://www.internic.net/domain/named.root
sudo mv root.hints /var/lib/unbound/
Configure unbound
#Highlights:
Listen only for queries from the local Pi-hole installation (on port 5353)
Listen for both UDP and TCP requests
Verify DNSSEC signatures, discarding BOGUS domains
Apply a few security and privacy tricks
This next section has you edit the file loacted at: /etc/unbound/unbound.conf.d/pi-hole.conf
server: # If no logfile is specified, syslog is used # logfile: "/var/log/unbound/unbound.log" verbosity: 0
port: 5353
do-ip4: yes
do-udp: yes
do-tcp: yes

# set to yes if you have IPv6 connectivity or have IPv6 issues. I disable IPv6 at my router.
do-ip6: no

# Use this only when you downloaded the list of primary root servers! - which you should have done in the previous step.
root-hints: "/var/lib/unbound/root.hints"

# Trust glue only if it is within the servers authority
harden-glue: yes

# Require DNSSEC data for trust-anchored zones, if such data is absent, the zone becomes BOGUS
harden-dnssec-stripped: yes

# Don't use Capitalization randomization as it known to cause DNSSEC issues sometimes
# see https://discourse.pi-hole.net/t/unbound-stubby-or-dnscrypt-proxy/9378 for further details
use-caps-for-id: no

# Reduce EDNS reassembly buffer size.
# Suggested by the unbound man page to reduce fragmentation reassembly problems
edns-buffer-size: 1472

# Perform prefetching of close to expired message cache entries
# This only applies to domains that have been frequently queried
prefetch: yes

# One thread should be sufficient, can be increased on beefy machines. usually not needed
num-threads: 1

# Ensure kernel buffer is large enough to not lose messages in traffic spikes
so-rcvbuf: 1m

# Ensure privacy of local IP ranges
private-address: 192.168.0.0/16
private-address: 169.254.0.0/16
private-address: 172.16.0.0/12
private-address: 10.0.0.0/8
private-address: fd00::/8
private-address: fe80::/10
Start your local recursive server and test that it's operational:
sudo service unbound start
dig pi-hole.net @127.0.0.1 -p 5353
The first query may be quite slow, but subsequent queries, also to other domains under the same TLD, should be fairly quick.
Test validation You can test DNSSEC validation using
dig sigfail.verteiltesysteme.net @127.0.0.1 -p 5353
dig sigok.verteiltesysteme.net @127.0.0.1 -p 5353
The first command should give a status report of SERVFAIL and no IP address. The second should give NOERROR plus an IP address.
If DNSSEC is not working, run:
apt install unbound ca-certificates
They should already be there, but I have had issues on some devices.
source: https://docs.pi-hole.net/guides/unbound/
Just to re iterate, this method does not enable DNS over TLS. The root servers do not support TLS at this time. project link below.
https://datatracker.ietf.org/wg/dprive/about/
Below is a work in progress.
This next section will have you enable a forwarder for DNS over TLS. as the root servers do not support TLS at this time. I havent performed this as i am holding out for DoT on the root servers. I do not trust cloudflare/anyone with my DNS traffic.
Update the certificates with:
sudo update-ca-certificates
Modify the configuration file /etc/unbound/unbound.conf as follows:
server:
port: 853
tls-upstream: yes
tls-cert-bundle: "/etc/ssl/certs/ca-certificates.crt"
forward-zone: name: "." forward-addr: 1.1.1.1
####The above IP is for cloudflare. #The above port is for CLOUDFLARE
Test with
dig @::1 -p 853 google.com or any other site that supports DoT
dig @::1 -p 853 google.com
Check DNS-Traffic
Make a DNS request by using nslookup for google.com while capturing the traffic with Wireshark. - windows users. this ensures end systems are using DoT
ripped from https://blog.cyclemap.link/2020-01-11-unbound/ working on a better writeup for those not versed in system configuration. ######WIP