one place for all tech stack NEVER FEAR FOR NOT TRY !! IF TODAY YOU NOT TRY THEN WHEN YOU TRY -- TRY AND LEARN
Info
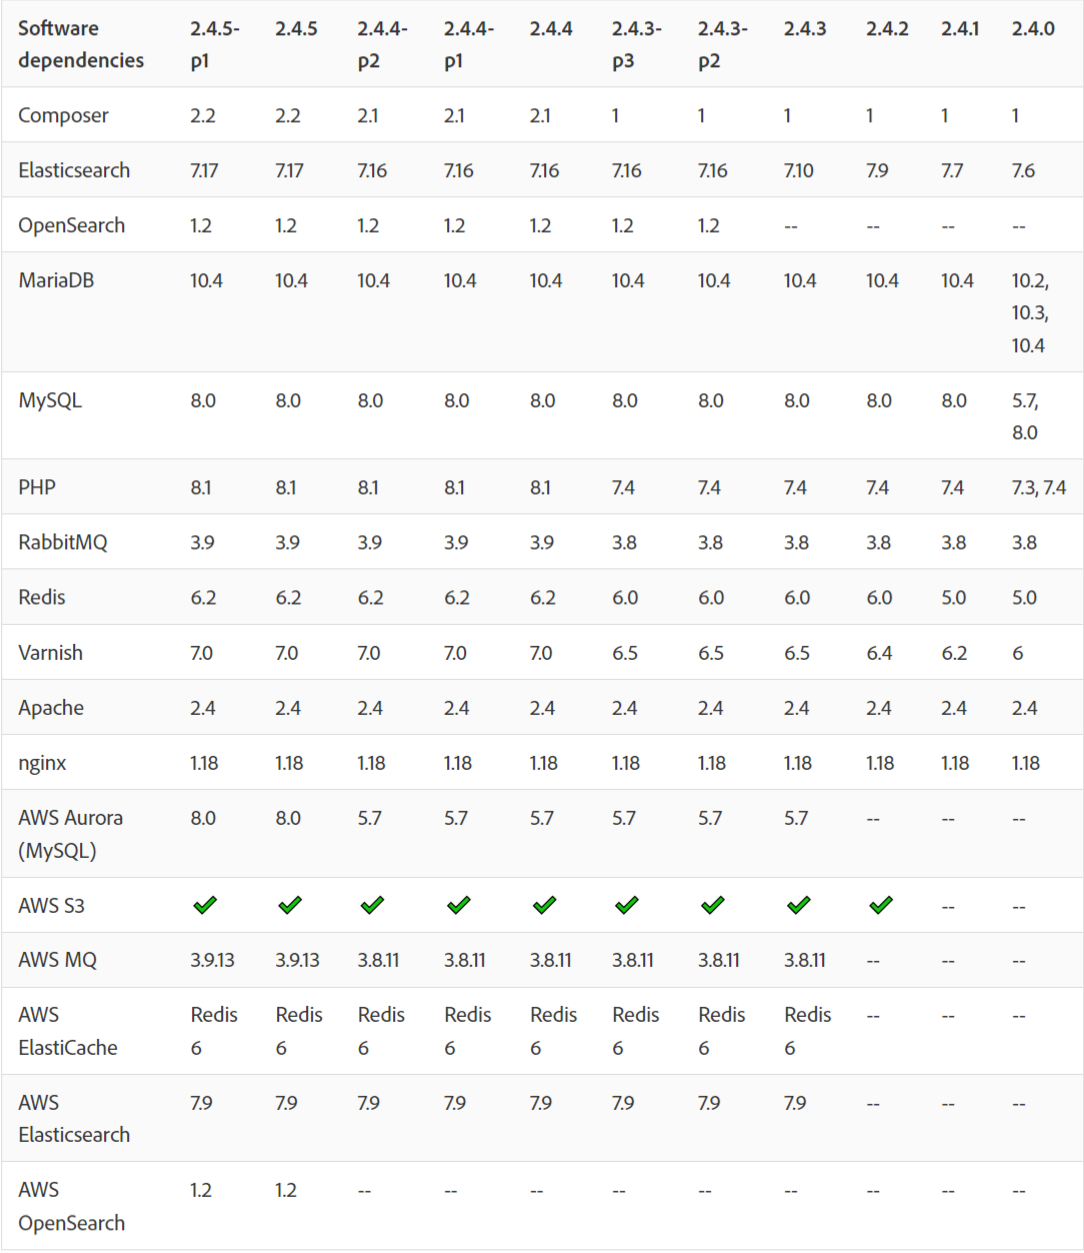
- All Language Install and Setup
Java Install On Ubuntu
       - sudo apt install openjdk-11-jdk
       - sudo apt install java-common
   - sudo  update-java-alternatives --list

       - sudo update-java-alternatives --set java-1.11.0-openjdk-amd64
   - java -version
       - export JAVA_HOME=/usr/lib/jvm/java-11-openjdk-amd64
<details><summary><b>Info</b></summary>
        General
        -------
           - php --version                              - Check Which Version php You have in your system
           - sudo update-alternatives --config php      - List All The Php Version & use as per your need
           - sudo systemctl restart php7.3-fpm  | start php7.3-fpm  | stop php7.3-fpm
           - sudo a2dismod php7.2
           - sudo a2enmod php7.4
           - sudo service php7.3-fpm status
           - sudo service php7.3-fpm stop
           - sudo service php7.3-fpm start
           - sudo service php7.4-fpm status
           - sudo service php7.4-fpm stop


           Php 8.1 = https://medium.com/@laraveltuts/how-to-install-and-run-php-8-x-on-ubuntu-20-04-8f18e7565c41

           Link - https://experienceleague.adobe.com/docs/commerce-operations/installation-guide/prerequisites/php-settings.html

           Devdocs - https://experienceleague.adobe.com/docs/commerce-operations/installation-guide/overview.html


        Install
        --------
         Add PHP PPA
         ------------
           - sudo apt install software-properties-common
           - sudo add-apt-repository ppa:ondrej/php
           - sudo apt-get update

           - sudo apt install php8.1 || sudo apt install php7.4 || sudo apt install php7.3  || sudo apt install php - choose your version
           - sudo apt-get install php7.4-common php7.4-xml php7.4-curl php7.4-bcmath php7.4-intl php7.4-gd php7.4-zip php7.4-mysql php7.4-soap php7.4-mbstring
           - sudo apt install php7.4-common php7.4-mysql php7.4 php7.4-cgi libapache2-mod-php7.4 php-pear php7.4-mbstring
           - ext-bcmath,ext-ctype,ext-curl,ext-dom,ext-gd,ext-hash,ext-iconv,ext-int,ext-mbstring,ext-openssl,ext-pdo_mysql,ext-simplexml,ext-soap,ext-xsl, ext-zip,              ext- sockets


           Install Php8.1
           ==============
                      - sudo apt install --no-install-recommends php8.1
                                - The --no-install-recommends flag will ensure that other packages like the Apache web server are not installed.

           Related Package Php8.1
           ----------------------
             - sudo apt install php8.1-extension_name
             - sudo apt-get install -y php8.1-cli php8.1-common php8.1-mysql php8.1-zip php8.1-gd php8.1-mbstring php8.1-curl php8.1-xml php8.1-bcmath


        Configure Php8.X File
        ---------------------
                - sudo nano /etc/php/8.1/apache2/php.ini    - open this file

                 - upload_max_filesize = 32M
                 - post_max_size = 48M
                 - memory_limit = 256M
                 - max_execution_time = 600
                 - max_input_vars = 3000
                 - max_input_time = 1000


        Un-install
        -----------
             - sudo apt-get purge php7.*
             - sudo apt-get autoclean
             - sudo apt-get autoremove
             - sudo apt autoremove
             - sudo apt-get --purge remove apache2


</details>
Info
Info
        Link Official
        -------------
                  - https://experienceleague.adobe.com/docs/commerce-operations/installation-guide/composer.html?lang=en

         General
         ---------
                - sudo php bin/magento setup:upgrade
                - sudo bin/magento setup:di:compile
                - sudo bin/magento setup:static-content:deploy -f
                - sudo bin/magento indexer:reindex
                - sudo bin/magento cache:flush
                - sudo bin/magento cache:clean
                - sudo bin/magento module:status
                - sudo php bin/magento   - check when Namespace error
                - sudo php bin/magento setup:di:compile
                - sudo chmod -R 777 var/ pub/ generated/
                - sudo bin/magento module:disable Codilar_Thor   - Disable any Module
                - rm -rf FolderName   - To Remove any Folder


         Disable the module
         ------------------
                -  sudo bin/magento module:disable Module_Name


         Magento Mode Show
         -----------------
             - sudo php bin/magento deploy:mode:show
             - sudo php bin/magento deploy:mode:set production
             - php bin/magento deploy:mode:set developer
             - php bin/magento deploy:mode:set default

         (Or)
              - Go to - app/etc/env.php
              -  'MAGE_MODE' => 'developer',    ------> here you need to specify - production, default


         Two Factor Authentication
         -------------------------
                - bin/magento module:disable Magento_TwoFactorAuth
                - bin/magento cache:flush


           Set the Mode - Production and Development
           -------------------------------------------
                - bin/magento dep:mod:show
                - php bin/magento deploy:mode:set production
                - sudo bin/magento de:mo:se developer
       Install
       -------
              step- 1
              --------
                        - Check the System Requirement
             step- 2
             --------
                Step For Local Magento Setup
                -------------------------------
                    - composer create-project --repository-url=https://repo.magento.com/ magento/project-community-edition:2.3.7-p1 .
                    - composer create-project --repository=https://repo.magento.com/ magento/project-community-edition:2.3.7 Magento237(your folder name)


             Latest version
             --------------
                   - sudo composer create-project --repository-url=https://repo.magento.com/ magento/project-community-edition:2.4.5-p1 local/


              (Or)

                 If You Want To Setup  For Project
                    -  Need step -1 complete
                    -  clone the project repo

            step -2)i)
            -----------
                    - Create Database on Mysql for install DB
                    - Also If You Want To Setup Using new User You can Create


            step-3
            -------
            Database Setup  (For Local)
            ---------------------------
            - bin/magento setup:install  --base-url=http://magento237.local/  --db-host=localhost  --db-name=magento  --db-user=magento237  --db- password=Sanjay1997@@ --backend-frontname=admin  --admin-firstname=admin  --admin-lastname=admin  --admin-email=devops1@codilar.com  --admin-user=admin1  --admin-password=admin123  --language=en_US  --currency=INR  --timezone=Asia/Kolkata  --use-rewrites=1

            If You are Doing Project Setup
            ------------------------------
            - Just need to check the core_Config_table and update the url
            - Also some time need to check with other files aslo
	       - select *from core_config_data where path like "%base_url%";
	       - select *from core_config_data where path like "%secure%";
                   - SELECT * FROM core_config_data where path like '%web/secure/use_in_adminhtml%';
                   - select *from core_config_data where path="web/cookie/cookie_domain";
                   - update core_config_data set value="http://southsmoke.local/admin/" where config_id=2762;
                   - update core_config_data set value="http://southsmoke.local/static/" where value="http://alfakher.com/static/";


            (Or) If Elasticsearch configuration needed

             - sudo bin/magento setup:install --base-url=http://casio.local/ --db-host=localhost --db-name=casio --db-user=root --db-password=1234 --admin-firstname=Sanjay --admin-lastname=Das --admin-email=cod34082@adobe.com --admin-user=sanjay --admin-password=sanjay123 --language=en_US --currency=USD --timezone=America/Chicago --use-rewrites=1 --search-engine=elasticsearch7 --elasticsearch-host=localhost --elasticsearch-port=9200


       If You Want To Create New User For Magento
       ---------------------------------------------
           -  php bin/magento admin:user:create --admin-user=local --admin-password=admin123 --admin-email=sanjay1@gmail.com --admin-firstname=admin --admin-lastname=admin


       Some Issue Need To Check After Install(May You Get Error)
       ----------------------------------------------------------

          - cd /etc/nginx/sites-available/
          - cd /etc/nginx/sites-enabled/
          - nginx.sample.config


     If You Have More Than One Magento
     -----------------------------------
          - sudo ln -s /etc/nginx/sites-available/magento237 /etc/nginx/sites-enabled     (Enable your project)
          - sudo unlink folder_name                                                       (Inside (/etc/nginx/sites-enabled/) Path)
          - sudo update-alternatives --config php                                        (list php and change the Php Version as per Magento Version)
          - sudo service nginx restart                                                    (Restart Your nginx)


    ElasticSearch Issue After changing the Database
    -----------------------------------------------
             - select *from core_config_data where path like "%elastic%";
             - change the port to ---> localhost


    Some Error To Solve in Magento
    ------------------------------

          - etc/nginx/sites-available/magento237(magento setup folder_name)         - Path of Folder
          - sudo nano magento237(folder_name)                                       - Need To Open this file or as same for other magento file

         - Check The Below Format
                                  upstream fastcgi_backend
                                  {
                                     server unix:/run/php/php7.4-fpm.sock;
                                   }
                                     server {
                                         listen 80;
                                         server_name local.test.com or (server_name _;);
                                         set $MAGE_ROOT /var/www/html/test;
                                         set $MAGE_RUN_TYPE website;
                                         include /var/www/html/test/nginx.conf.sample;
                                     }


          - Also Some time Some memory  issue(502 Bad gateway Error) so you can add  Inside(var/www/html/Magento_Folder_Name/nginx.conf.sample file)

                                         fastcgi_buffers 8 16k;
                                         fastcgi_buffer_size 32k;
                                         fastcgi_connect_timeout 90;
                                         fastcgi_send_timeout 90;
                                         fastcgi_read_timeout 90;

          Some Quick Way Need To Check For Get Error
          -------------------------------------------
             -  var/www/html/magento_folder_name/app/etc/env.php        ---- >  check the user and database password and all
             -  var/www/html/magento_folder_name/nginx.conf.sample      ----->  check the memory code
             -  other location --> computer  --> etc/hosts              -----> check the url is added or not
             -  other location --> computer  --> etc/nginx              -----> check  file inside nginx
             -


       For Fresh Setup
      ---------------
        - after giving composer comand you will get error like  - Could not find package magento/project-community-edition with version 2.4.5-p2.
                |
                -----Here simple it means - you are trying for enterprise edition or patch)p1/p2) which is not available
                |
                ----- some time need to use sudo for permission issue(to write and execute that installation folder)


         - Check with Error
         ==================
                     This site can’t be reached
                      Check if there is a typo in magento.local.
                      DNS_PROBE_FINISHED_NXDOMAIN.

                        Solution - make sure you declare - url(http://name/) -In  etc—> hosts

         -Check with This Error Also
         ============================
         Failed to send the message. Please contact the administrator

                        - Solution - bin/magento module:disable Magento_TwoFactorAuth


Setup Database in Magento (If you have  Already Existing Project Setup and Also You Have Existing Database but You Forget Your Uname and PassWd )
------------------------------------------------------------------------------------------------------------------------------------------------

Step-1
-------
  - bin/magento setup:install  --base-url=http://shopmonk.local/  --db-host=localhost  --db-name=rehandel  --db-user=magento  --db-password=Magento@123 --backend-frontname=admin  --admin-firstname=admin  --admin-lastname=admin  --admin-email=sanjay.d@codilar.com  --admin-user=admin1  --admin-password=admin123  --language=en_US  --currency=INR  --timezone=Asia/Kolkata  --use-rewrites=1

Step -2
--------
 - sudo php bin/magento admin:user:create --admin-user='admin1' --admin-password='admin123' --admin-email='sanjay.d@codilar.com' --admin-firstname='Sanjay' --admin-lastname='Kumar'

Step -3
-------
 - SELECT *FROM `core_config_data`WHERE (`scope` LIKE '%cookie%' OR `path` LIKE '%cookie%' OR `value` LIKE '%cookie%') LIMIT 50
 - Change the Value -  web/cookie/cookie_domain  to /
 - Syntax to update => update core_config_data set value="/" where config_id = 102;
Info
Info
   Install vs code
   ---------------
       - sudo snap install code --classic


   Un-install vs code
   ------------------
         -


  Vs code setting
  ---------------

             For Tree View OF Files
             ----------------------
                                 - Setting>Search Compact Folder > Un-Checked the Check Box
                                 - Setting > Search Tree Indent


            Codding Help Extensions
            -----------------------
                                  - Auto Rename Tag
                                  - Live Server
                                  - Prettier - Code Formatter
                                  - vscode-icons
                                  - codeStackr Theme
                                  - Fluent Icons
                                  - Bracket Pair Colorizer
Info
Install Phpstrom ----------------- - https://snapcraft.io/phpstorm - https://github.com/RisesunStudios/ide-eval-resetter -- Phpstorm reset eval - sudo snap install phpstorm --classic - sudo snap install phpstorm --channel=2020.3/stable --classic -- Specific version - sudo snap remove phpstorm
Usefull Extension for PhpStorm
------------------------------
Completly Uninstall PhpStrom
----------------------------
- sudo snap list
- sudo snap remove phpstorm
- whereis phpstrom
Activation of Php
------------------
- Help -- > Register
Info
- sudo snap install postman
   General
             - sudo snap remove eclipse
             -
             -

   Install
             -
             -
             -
             -

   Un-Install
             -
             -
             -
Info
- sudo snap install slack
- wget -qO - https://keys.anydesk.com/repos/DEB-GPG-KEY | apt-key add -
- echo "deb http://deb.anydesk.com/ all main" > /etc/apt/sources.list.d/anydesk.list
- sudo apt update
- sudo apt install anydesk
- anydesk
-
sudo apt install snapd
-
sudo snap install drawio
Info
Info
General -------- - mysql --version - sudo service mysql status - sudo service mysql stop - sudo service mysql start Install -------- - sudo apt policy mysql-server - sudo apt update - sudo apt install wget -y - wget https://dev.mysql.com/get/mysql-apt-config_0.8.12-1_all.deb - sudo dpkg -i mysql-apt-config_0.8.12-1_all.deb (Or)
- sudo apt-cache policy mysql-server
- sudo apt install -f mysql-client=5.7* mysql-community-server=5.7* mysql-server=5.7*
- sudo mysql_secure_installation
Un-install
-----------
- sudo systemctl stop mysql
- sudo apt-get purge mysql-server mysql-client mysql-common mysql-server-core-* mysql-client-core-*
- sudo apt-get remove --purge mysql*
- sudo apt autoremove
- sudo apt-get autoclean
- sudo rm -rf /var/lib/mysql
- sudo rm -rf /etc/mysql
-
Mysql user issue
------------------
- SELECT User, Host FROM mysql.user;
- select user from mysql.user;
- CREATE USER 'magento237'@'localhost' IDENTIFIED BY 'password';
- GRANT ALL PRIVILEGES ON *.* TO 'magento237'@'localhost' WITH GRANT OPTION;
- FLUSH PRIVILEGES
- exit
Mysql User error
----------------
- SELECT user,authentication_string,plugin,host FROM mysql.user;
- ALTER USER 'root'@'localhost' IDENTIFIED WITH mysql_native_password BY '1234';
- FLUSH PRIVILEGES;
Import Existing Database
-------------------------
- mysql -u username -p database_name < file.sql - Syntax for import existing database file
-
Import Other Way
-----------------
- Download the Sql File
- Go To that Directory
- Open Terminal From That Directory
- Open MySql(mysql -u Username -pPassword)
- run the command for import --->(source file.sql(only this name- rehnadel_22-02-14.sql ) not this name -> /home/prem/Desktop/rehnadel_22-02-14.sql
- source rehnadel_22-02-14.sql;
Export Database
----------------
- mysqldump -u magento -p rehandel > rehandel.sql
- mysqldump -u magento -p rehandel > rehandel.sql --single-transaction (If this command not run just try in (prem@sanjay:~/Downloads$) other path
Install Mysql work Bench Ubuntu
-------------------------------
- sudo snap install mysql-workbench-community
Info
Info
- sudo apt update - sudo apt install snapd - sudo snap install beekeeper-studioInfo
   Install On Ubuntu
   =================
          - visit mongoDb Official Site i.e - https://www.mongodb.com/try/download/community
      - select
                   - lsb_release -a   --- check ubuntu version
                   - version
	       - platform
	       - package
      - after select now download

          - cd Downloads (i keep the download file in this directory)
                    - sudo dpkg -i mongodb-org-server_7.0.5_amd64.deb    --- unzip the

          - sudo systemctl status mongod
          - sudo systemctl start mongod
      - sudo systemctl stop mongod

     - Connect Database into some GUI and CLI

               - visit the same link as above go to --> products ---> select community editions
	   - Tools
                   |------ MongoDb Shell -------- CLI  ----> https://www.mongodb.com/try/download/shell
	                   - version
			   - platform
			   - package

                   |------ MongoDB Compass Download (GUI)  ----> https://www.mongodb.com/try/download/compass
	                     - version
			     - platform
			     - package

          - cd Downloads
          - sudo dpkg -i mongodb-mongosh_2.1.5_amd64.deb ---> CLI
      - mongosh (check the download is sucess) ---------> go inside the mongo cli

          - sudo dpkg -i mongodb-compass_1.42.1_amd64.deb   ----------- GUI
      - mongodb-compass
Info
Info
      - install magento
  - cd /var/www/html
      - mkdir local
  - sudo composer create-project --repository-url=https://repo.magento.com/ magento/project-community-edition:2.4.5
- setup database and all
     - after setup now you can push code to your git repo
 -
     - git init
 - git add .
     - git commit -m "message"
 - git remote add origin https://github.com/itzsanjayCodilar/pro-active-shopping-experience.git
 - git branch -m master main

 Or
     - Search and Fix
 - git fetch --all
     - git remote -v
 - git checkout main
     - git merge master
 - git push origin main
Info
Info
Mysql is Not Starting in Xampp ------------------------------ - It is not working because If 3306 port already used (may be another mysql is available) - Open C:\xampp\phpMyAdmin ==> config.inc |--------> $cfg['Servers'][$i]['AllowNoPassword'] = true; add below line after this line |--------> $cfg['Servers'][$i]['port'] = 3308; - Open Xampp Panel ---> Near Start/Stop ---> Admin --> Config |------ Click on This |---- It will show my.ini file |-----Here change the Port 3306 to 3308Info
- If you changed the port number (like - 3308) then you will get below error (Open C:\xampp\phpMyAdmin ==> config.inc here you will get port number) - Error establishing a database connection, XAMPP
Solution - in username field put = localhost:3308
Info
# Get the Serial number of Windows
      - open CMD as Administrator
      - type - wmic bios get serialnumber

# Format Pendrive
      - open CMD as Administrator
      - diskpart
      - list disk
      - select <disk-name>
      - clean
      - create partition primary
      - format ft-ntfs
      - assign

 # How to Open Bios Setting

      - For Lenevo Ideapad Gamming 3
                          - Function(Fn) + F2
                          - Function(Fn) + F12

# Change the C Drive to D Drive CMD Way
         - C:\Users\user>cd..
         - C:\Users>cd ..
         - C:\>D:
         - D:\>cd \foldername


# React setup for windows

        - nvm -------> helps to use multiple version of react
        - nvm -v
    - nvm list
    - nvm use <node version>    e.g =>nvm use 18.13.0

 Install latest version

      -
Info
Prerequisite For Laravel Install in Windows Os
     Method-1 - https://www.youtube.com/watch?v=Czhoqx86V24&ab_channel=EduonixLearningSolutions
     =========
        Step-I
        -------
                   - Install Xampp  - Apache will not work in new windows - https://stackoverflow.com/questions/27333203/xampp-couldnt-start-apache-windows-10
                   - Install Composer
                   - Install Vs Code or Any Editor You Want
       Step-II
       -------
                  -
                  -
Info
Info
- https://magefan.com/blog/magento-extension-code-quality
Way -1
------
Go to /var/www/html
-------------------
- git clone https://github.com/magento/magento-coding-standard.git
- cd magento-coding-standard
- composer install
If Permission issue
sudo chmod -R 777 /var/www/html/magento-coding-standard
Check the Particular Module
---------------------------
- vendor/bin/phpcs /path/to/your/extension --standard=Magento2 > log.txt ---> syntax for Check standard
- vendor/bin/phpcs /var/www/html/marina/app/code/Codilar/CustomRestApi --standard=Magento2 > log.txt --- log.txt (all errors)
Direct Command
--------------
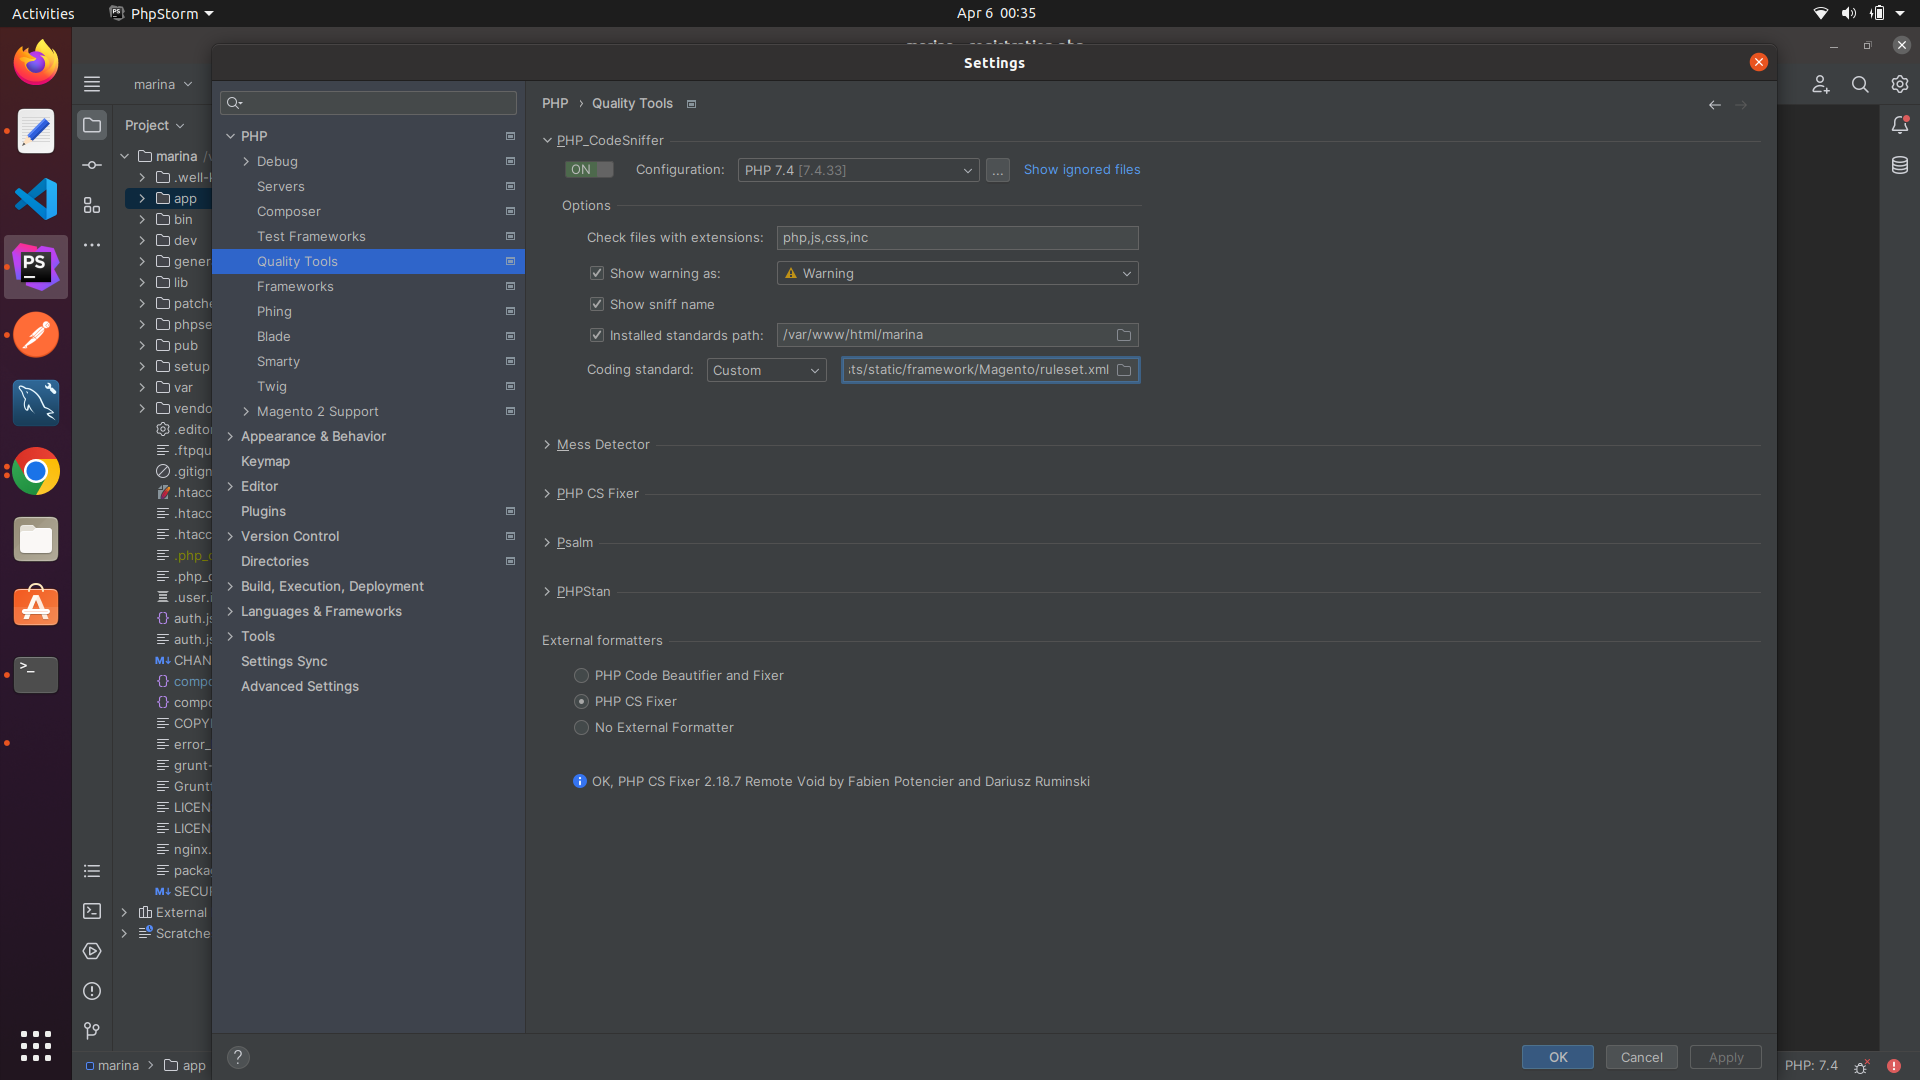
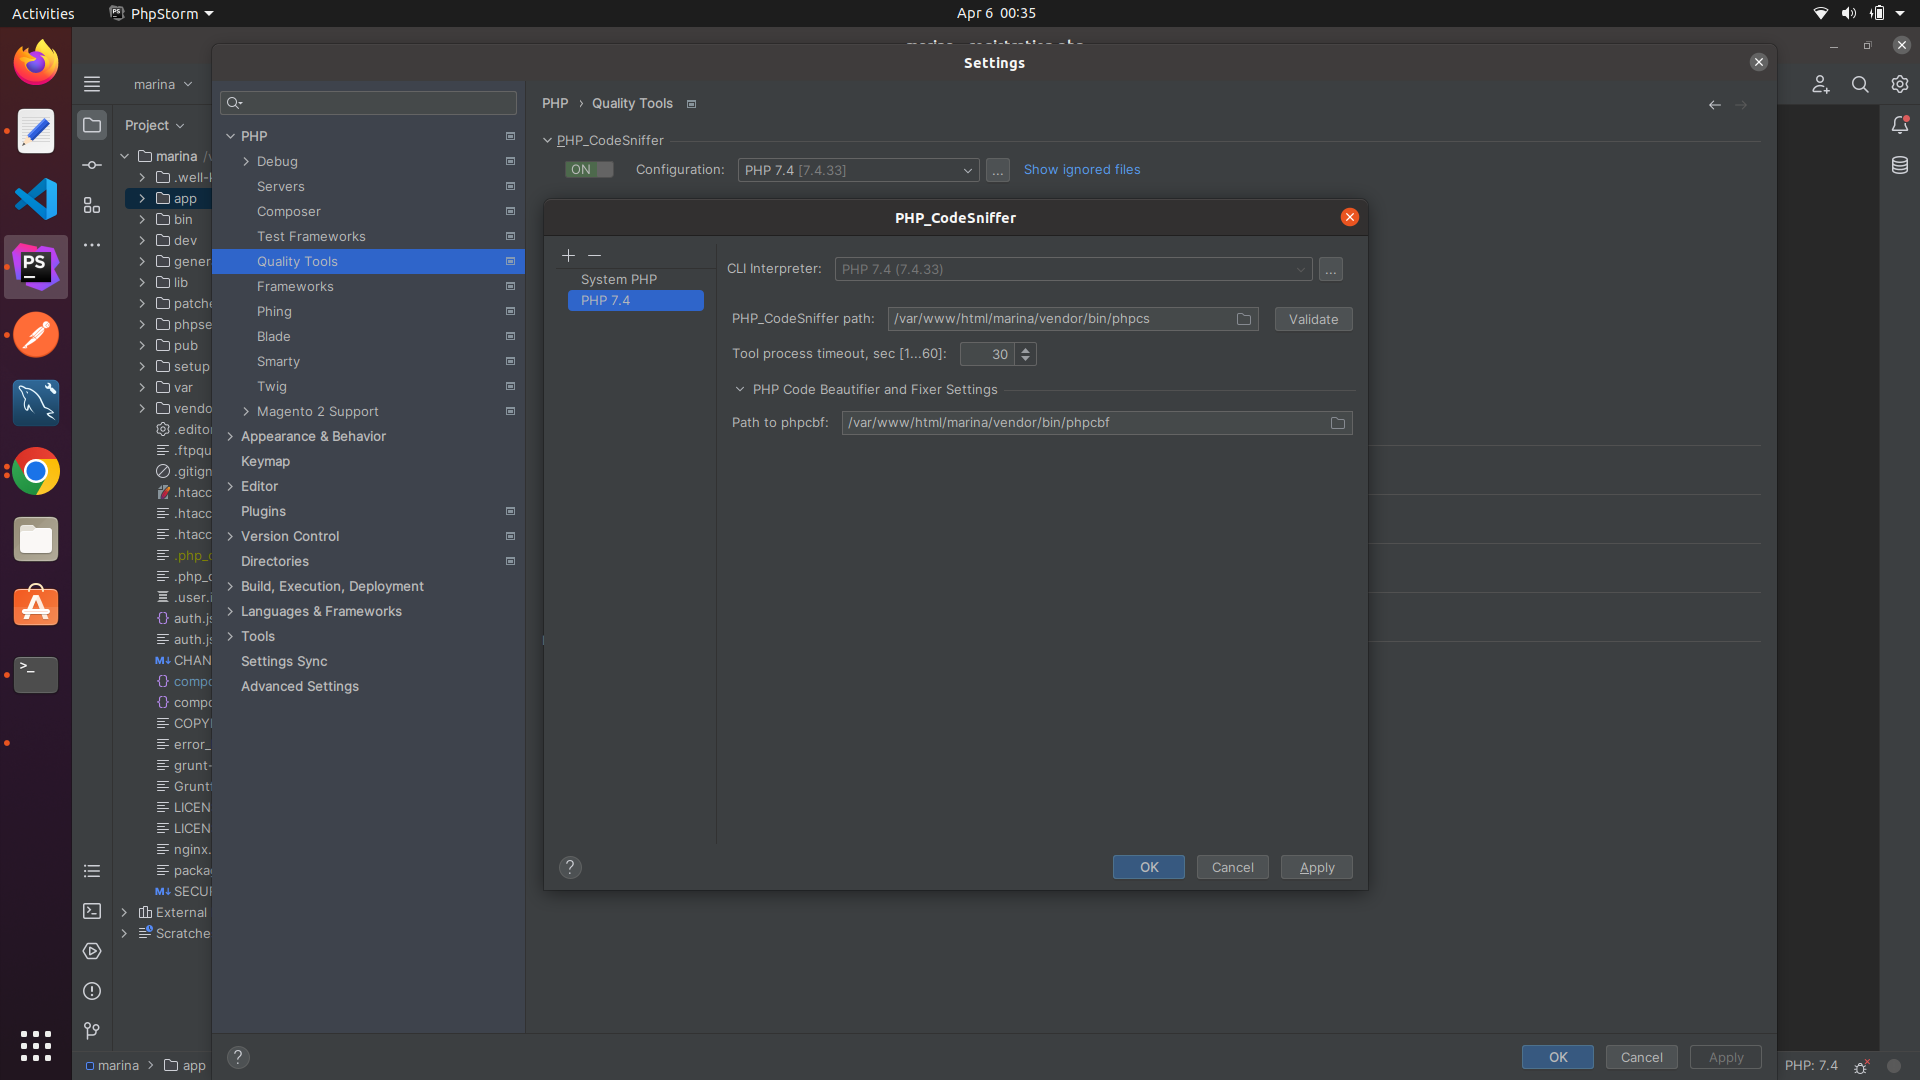
- ./vendor/bin/phpcs --standard=./dev/tests/static/framework/Magento/ruleset.xml app/code/CasioSingapore/
PSR1/PSR2
----------
- Open PhpStorm -> Go To Files ->Setting -> Search for Php->Code Style->Php--> Right Side corner->Set From -->Select the Coding Standard.

Info
       Install of RabbitMQ   - All setup mention in given docs link only .
       -------------------
               - sudo apt install -y rabbitmq-server   - you can go this or you can go with below link

                                                                  - https://tecadmin.net/install-rabbitmq-server-on-ubuntu/


       General Command
       ---------------
       - systemctl status rabbitmq-server


       Configure With Magento Project
       ------------------------------
       Step -1
       -------

       - Open - Magento Project Directory  -- Check with  env.php  inside this file paste the below code. for run RabbitMq wth Magento

                      'queue' => [
                                 'amqp' => [
                                           'host' => '127.0.0.1',
                                           'port' => '5672',
                                           'user' => 'guest',
                                           'password' => 'guest',
                                           'virtualhost' => '/',
                                           'ssl' => ''
                                           ]
                                  ],

        Step -2
        -------
                - after this run setup & upgrade command in magento directory.
                - open your local rabbitMQ and go to Queue check any queue you have or not.

       - Check the rabbitMQ is working or not

                          - your project url and port number like - http://adobe.training:15672/
                          - you may got this project used in some other location then kill the port.
                                   Ex - npx kill-port 8080(put which port error is showing)
       Un-Install Command
       ------------------
Info
 <i> Referecne docs - https://www.rakeshjesadiya.com/install-mailhog-in-ubuntu-php-environment/ </i>

 Step-1
 -------
      - Common Directory
      - sudo apt-get update
      - sudo apt-get install golang-go

 Step-2
 -------
      - Install MailHog = go get github.com/mailhog/MailHog
      - Install mhsendmail = go get github.com/mailhog/mhsendmail

 Step-3
     ------
     - echo "$USER"    - For check the User (Which user name of system)

     - sudo cp /home/{system_user}/go/bin/MailHog /usr/local/bin/mailhog         - sudo cp /home/sanjay/go/bin/MailHog /usr/local/bin/mailhog
     - sudo cp /home/{system_user}/go/bin/mhsendmail /usr/local/bin/mhsendmail   - sudo cp /home/sanjay/go/bin/mhsendmail /usr/local/bin/mhsendmail

Step-4
------
     - Now Modify the php.ini to setup MailHog path
          |
          |---I am working with PHP 7.4 version, So My  php.ini path location would be  /etc/php/7.4/fpm/php.ini

          |--- sudo nano php.ini

      - Now update ;sendmail_path = with the given line. Remove the semicolon from the starting and update the path,
           - sendmail_path = /usr/local/bin/mhsendmail

      - If not Work add path to  PHP - CLI  also and Restart the FPM (sudo service php7.4-fpm restart)

Step-5
------
      - To Start the Mailhoh is Working or not

               - run   =  mailhog

       - Open your Browser(chrome)
                       |------------http://localhost:8025
                                              |
                                              Project Wise
                                                      |----http://blank.m24.test:8025/
                                                      |----http://fresh.local:8025/

Step-6
-------
        - Now Click on Enable Jim

        - Place one Order from magento side and check the mailHog

        "Congradulations -- Finally You Setup MailHog"  - If any Error Take Help of Google
Info
  General
  --------
              - service elasticsearch status
              - /etc/init.d/elasticsearch status
              - /etc/init.d/elasticsearch start
              - /etc/init.d/elasticsearch stop
              - /etc/init.d/elasticsearch restart
              - /etc/init.d/elasticsearch force-reload - service elasticsearch status
              - /etc/init.d/elasticsearch status
              - /etc/init.d/elasticsearch start
              - /etc/init.d/elasticsearch stop
              - /etc/init.d/elasticsearch restart
              - /etc/init.d/elasticsearch force-reload

 Install
 -------

              - curl -fsSL https://artifacts.elastic.co/GPG-KEY-elasticsearch | sudo apt-key add -
	  - echo "deb https://artifacts.elastic.co/packages/7.x/apt stable main" | sudo tee -a /etc/apt/sources.list.d/elastic-7.x.list
              - sudo apt update
              - sudo apt install elasticsearch
	  - sudo nano /etc/elasticsearch/elasticsearch.yml
                    - network.host: localhost
                    - xpack.security.enabled: false

              - sudo systemctl start elasticsearch
              - sudo systemctl enable elasticsearch

              - sudo ufw allow from 198.51.100.0 to any port 9200

              - sudo ufw enable

              - sudo ufw status

              - curl -X GET 'http://localhost:9200'

Links:-
------
     - https://www.digitalocean.com/community/tutorials/how-to-install-and-configure-elasticsearch-on-ubuntu-20-04
Info
    General
    ---------
        - composer -v
        - cd
        - pwd
        - check the php must be install
        - Some time - By default it will install composer version -1 so you need to un-install the version-1 and again need to install
    Install
    ---------
        - sudo apt install composer          - when you run this one it will install composer version -1
        - https://getcomposer.org/download/  - official site for install (when you run this one it will install composer version -2)

       ( or)
        - sudo apt install unzip
        - curl -sS https://getcomposer.org/installer -o composer-setup.php
        - sudo php composer-setup.php --install-dir=/usr/local/bin --filename=composer
   Un-install
   ----------
        - sudo apt-get remove composer
        - sudo apt-get autoremove composer
        - sudo apt-get purge composer
        - sudo apt-get autoremove --purge composer


  Composer Self-Update to Other Version
  -------------------------------------
        - sudo composer self-update --1
        - sudo composer self-update --2


  Install Any Third Party Module using Composer
  ---------------------------------------------
  -    Here we need to Install this third party module   E.g -  amasty/promo "version": "2.9.7",

  By Terminal Way
  ---------------
  -    composer require amasty/promo:2.9.7
 - Doing some Changes on Module
          |--------------------Creating Pr -- Pr got Merged ---> Create new Tag after PR Merged   - tag-1.0.2


 - Go to Our Existing Branch Which Already Got Merged
                           |------Take pull - and add the Tag Version into - composer.json(main composer.json)
                                   |
                                   |--------Run Composer Update
                                             |
                                             |----After running of composer update it will automatically update into composer.lock
- When we run composer install - it will check the composer file and generate the composer.lock file
composer.json -- when we run composer update it will take all the updated version version mention in composer.json into composer.lock
Details
Composer.json Vs Composer.lock - Doing some Changes on Module
|--------------------Creating Pr -- Pr got Merged ---> Create new Tag after PR Merged - tag-1.0.2
- Go to Our Existing Branch Which Already Got Merged
|------Take pull - and add the Tag Version into - composer.json(main composer.json)
|
|--------Run Composer Update
|
|----After running of composer update it will automatically update into composer.lock
Details
Composer Install vs Composer Update Composer Install
----------------
- When we run composer install - it will check the composer file and generate the composer.lock file
Composer Update
----------------
composer.json -- when we run composer update it will take all the updated version version mention in composer.json into composer.lock
Info
       General
       ----------
                    - whereis apache2                       - check the if furthur exist after uninstall
                    - apache2 -v  || apache2 --version
                    - sudo service apache2 start
                    - sudo service apache2 status
                    - sudo service apache2 stop
                    - systemctl status apache2.service
                    - sudo systemctl enable apache2.service
                    - sudo nano /etc/apache2/sites-available/magento2.conf
                    - sudo a2enmod rewrite

       Install
       --------
                 - sudo apt install apache2

     Un-install
     -----------
                  - sudo apt-get purge apache2 apache2-utils apache2.2-bin apache2-common
                  - sudo apt-get autoremove
                  - sudo rm -rf /etc/apache2
                  - sudo apt autoremove apache2
Info
  General
  --------
       - nginx --version
       - sudo service nginx status | stop | start | restart
       - sudo systemctl stop nginx.service
       - sudo systemctl start nginx.service
       - sudo systemctl enable nginx.service
       - sudo nano /etc/nginx/sites-available/default

    (Or)
        - /etc/init.d/nginx status
        - /etc/init.d/nginx stop
        - /etc/init.d/nginx start

  Install
  ---------
       - sudo apt install nginx
       -
       -
       -
       -

  Un-install
  -----------
       - sudo apt-get remove nginx nginx-common
       - sudo apt-get purge nginx nginx-common
       - sudo apt-get autoremove
  Nginx Issue
  ------------
       - sudo nginx -t
       - tail -f /var/log/nginx/error.log
       - ps auxf | grep nginx
Info
Info
Details
     SMTP Installation For Magento - 2
     ----------------------------------
       Guide Link
       -----------
                 - https://github.com/mageplaza/module-core  (reference )
                    - sudo composer require mageplaza/module-core     - install
                    - sudo composer require mageplaza/module-smtp     -
                    - sudo composer remove mageplaza/module-core      - un-install
                    - sudo composer remove mageplaza/module-smtp

                   - sudo composer update mageplaza/module-core    - If Previous version is not working then update the extension ( licence 				 activation issue after adding  gmail account app password )
                   - sudo composer require mageplaza/module-smtp

    Magento Market Place Key
    ------------------------
     - Magento Market Place (https://marketplace.magento.com/)
     My Profile-->Access Key --> Create new --> give any name

                    Public Key   = 27f19ff144e9ec3b7a66a844feb13a4f
                    Private Key  = e435d9f2831d076f07f6a5666ecc0c27

    Configuratin
    ------------
         Store--> Configuration ---> Mageplaza Extensions
                                      |
                                      |--------- SMTP
                                                  |
                                                  |
                                                  |----- Module information
                                                  |                 |----- userName - sanjay
                                                  |                 |----- Email    - sanjay.d@gmail.com
                                                  |
                                                  |----- General Configuration
                                                  |                 |
                                                  |                 |------Enable Mageplaza SMTP  ----> make it yes
                                                  |                 |------Log Emails             ----> make it Yes
                                                  |
                                                  |----- SMTP Configuration Options
                                                                     |
                                                                     |--- Host           - smtp.gmail.com
                                                                     |--- Port           - 587
                                                                     |--- Protocol       - TLS
                                                                     |--- Authentication - LOGIN
                                                                     |--- Username       - sanjay.d@codilar.com
                                                                     |--- Password       - You got from (App Password for Gmail Account)

    Get App Password
    -----------------
            Search on google
                |--- app password gmail (create one)
Details
    Xdebug Setup in Local
    ----------------------
          - https://devdocs.magento.com/cloud/howtos/debug.html
          - Go With Below link
                 |
             |- https://www.linkedin.com/pulse/how-install-xdebug-config-phpstorm-ubuntu-jun-wu
Details
Step - 1
========
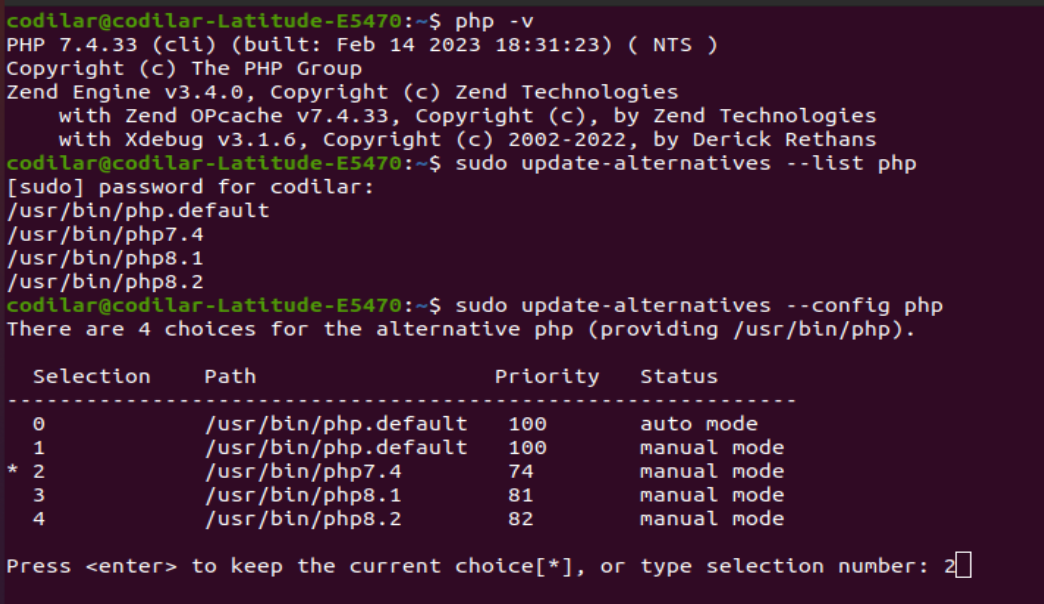
check php version
|
|- php -v
list all php version
|
|- sudo update-alternatives --list php
switch to particular php version
|
|- sudo update-alternatives --config php
Step -2
=======
Install Xdebug
|
|-- sudo apt-get install xdebug
|-- sudo apt-get install php-dev
|-- sudo pecl install xdebug
|
| (If abouve 3 command way not work)
|
|- sudo apt-get install php-xdebug
| (or)
|- sudo apt-get install php7.4-xdebug (As Per Php Version )
Step -3
=======
Find all php.ini files (For our understanding only)
|
|--- sudo find / -name php.ini
Step - 4
========
Configure for php.ini File
-----------------------------
Open php.ini file and add below lines (FPM)
-------------------------------------------
|
|
|--where you will get php.ini file
|
|----/etc/php/7.4/fpm (where do "ls") (i am using php version 7.4)
|
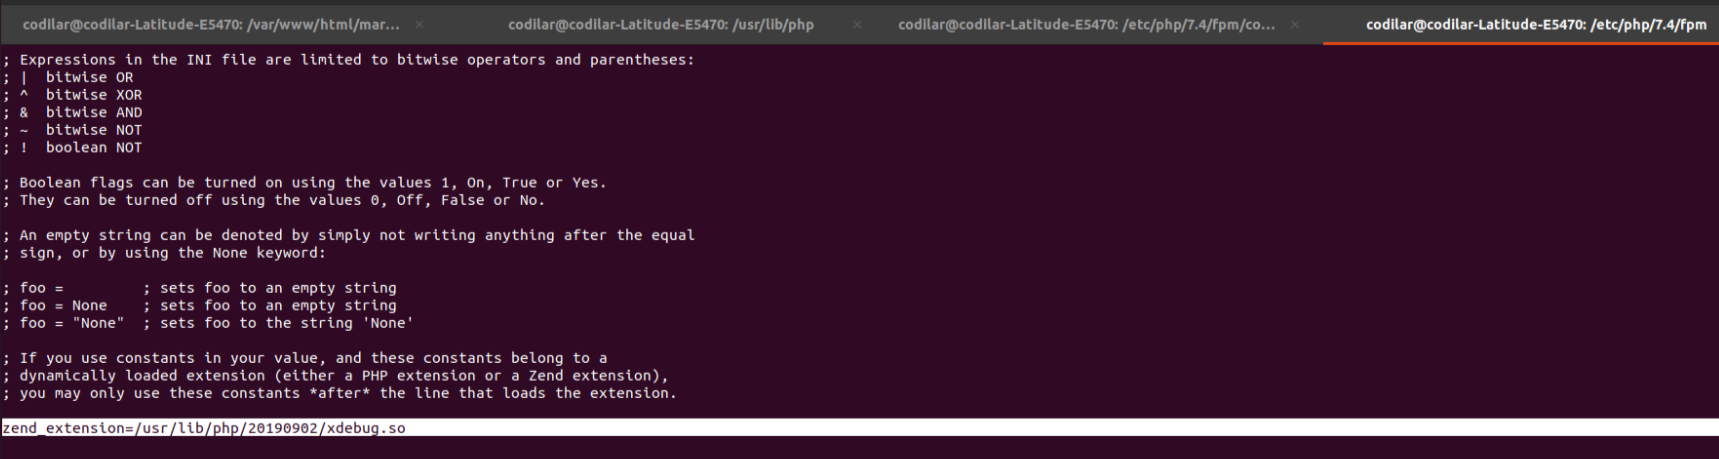
|------- cat php.ini (sudo nano php.ini )
; If you use constants in your value, and these constants belong to a
; dynamically loaded extension (either a PHP extension or a Zend extension),
; you may only use these constants *after* the line that loads the extension.
|
|
|------------------> after this line paste below line
|
|--- zend_extension=/usr/lib/php/20190902/xdebug.so
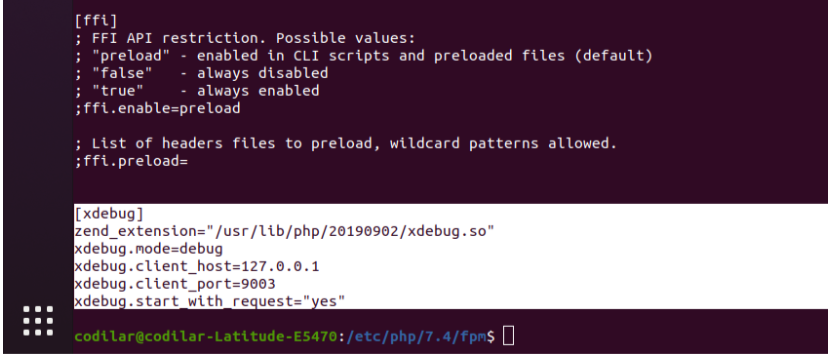
At the end add below lines
--------------------------
[xdebug]
zend_extension="/usr/lib/php/20190902/xdebug.so"
xdebug.mode=debug
xdebug.client_host=127.0.0.1
xdebug.client_port=9003
xdebug.start_with_request="yes"
Step -5
=======
Configure for xdebug.ini File
-----------------------------
Open xdebug.ini add below line (in mycase file name is something like this - 20-xdebug.ini)
-------------------------------------------------------------------------------------------
|
|
|-- where you will get xdebug.ini file
|
|-- etc/php/7.4/fpm/conf.d (here i am using php7.4)
|
|------- cat xdebug.ini (sudo nano 20-xdebug.ini)
Add below lines
---------------
zend_extension="/usr/lib/php/20190902/xdebug.so"
xdebug_mode="debug"
xdebug.client_port=9003
xdebug.start_request="yes"
Step -6
=======
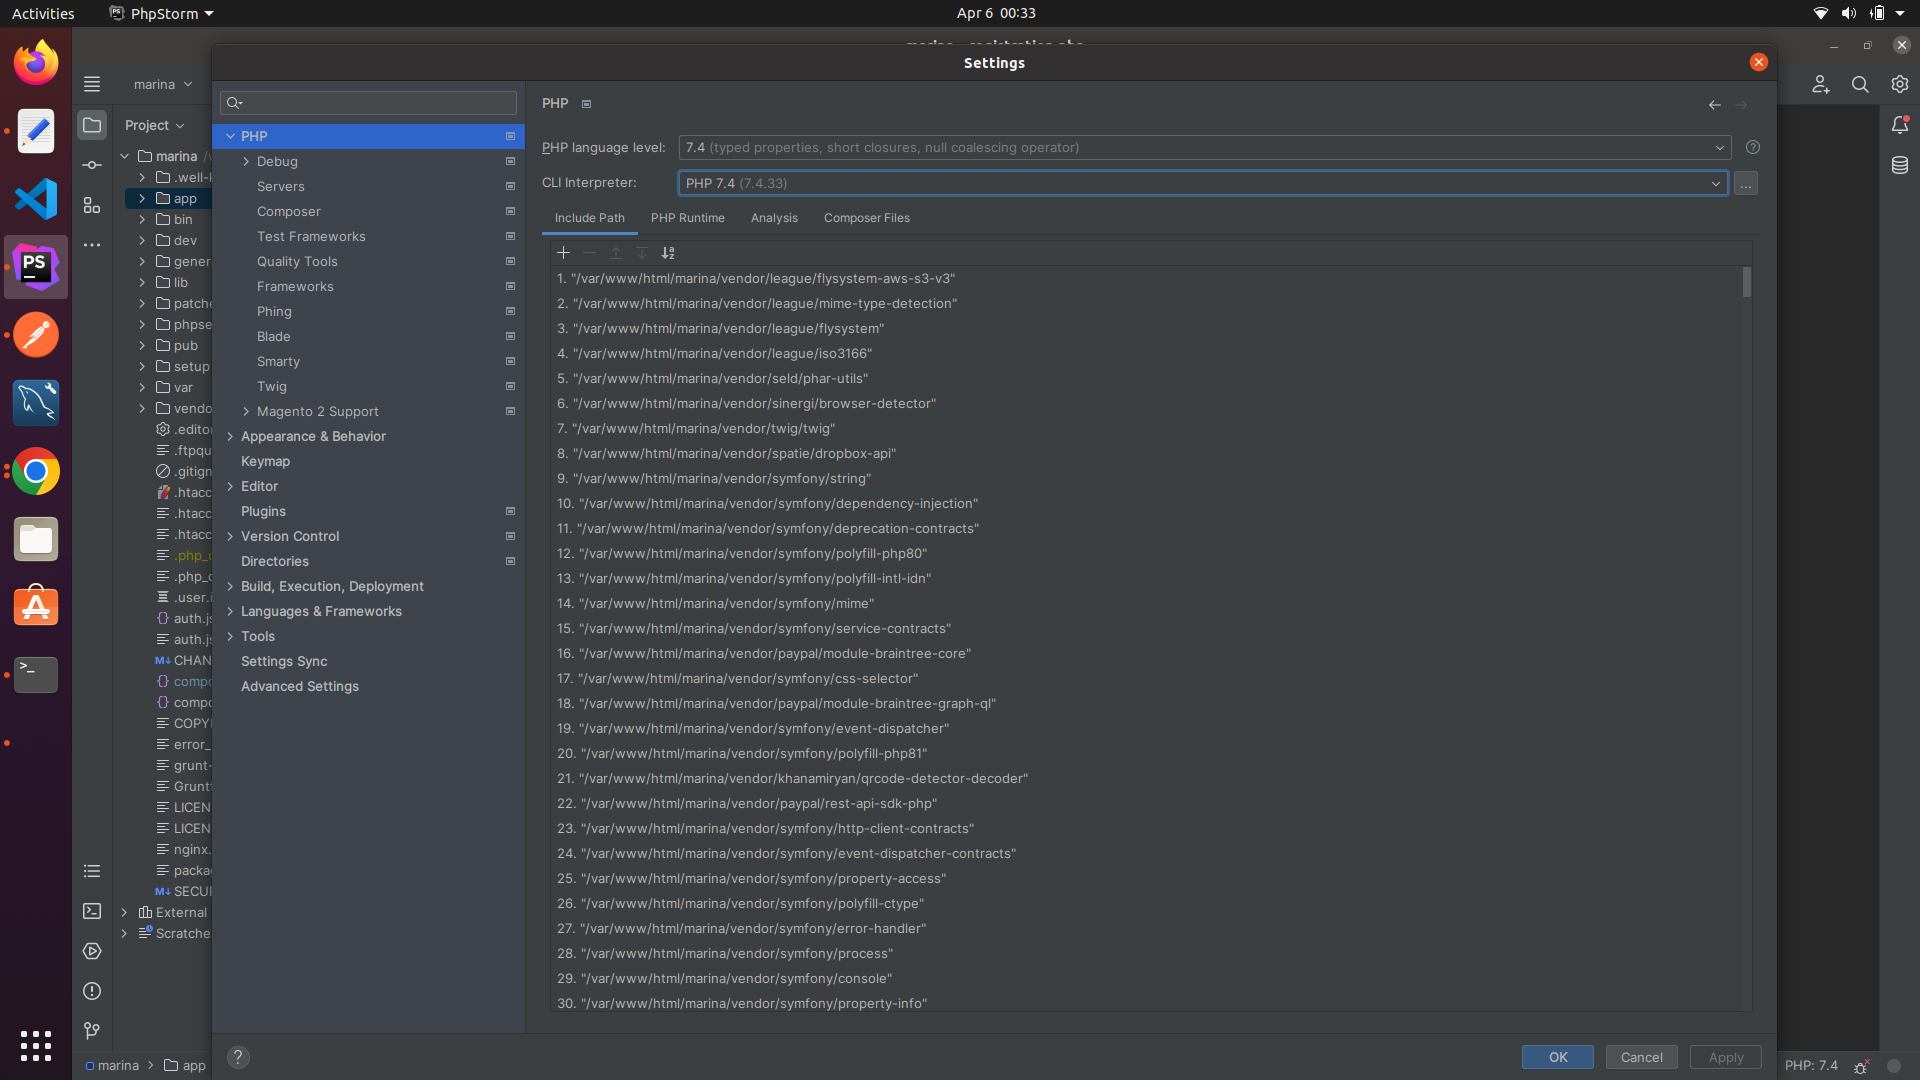
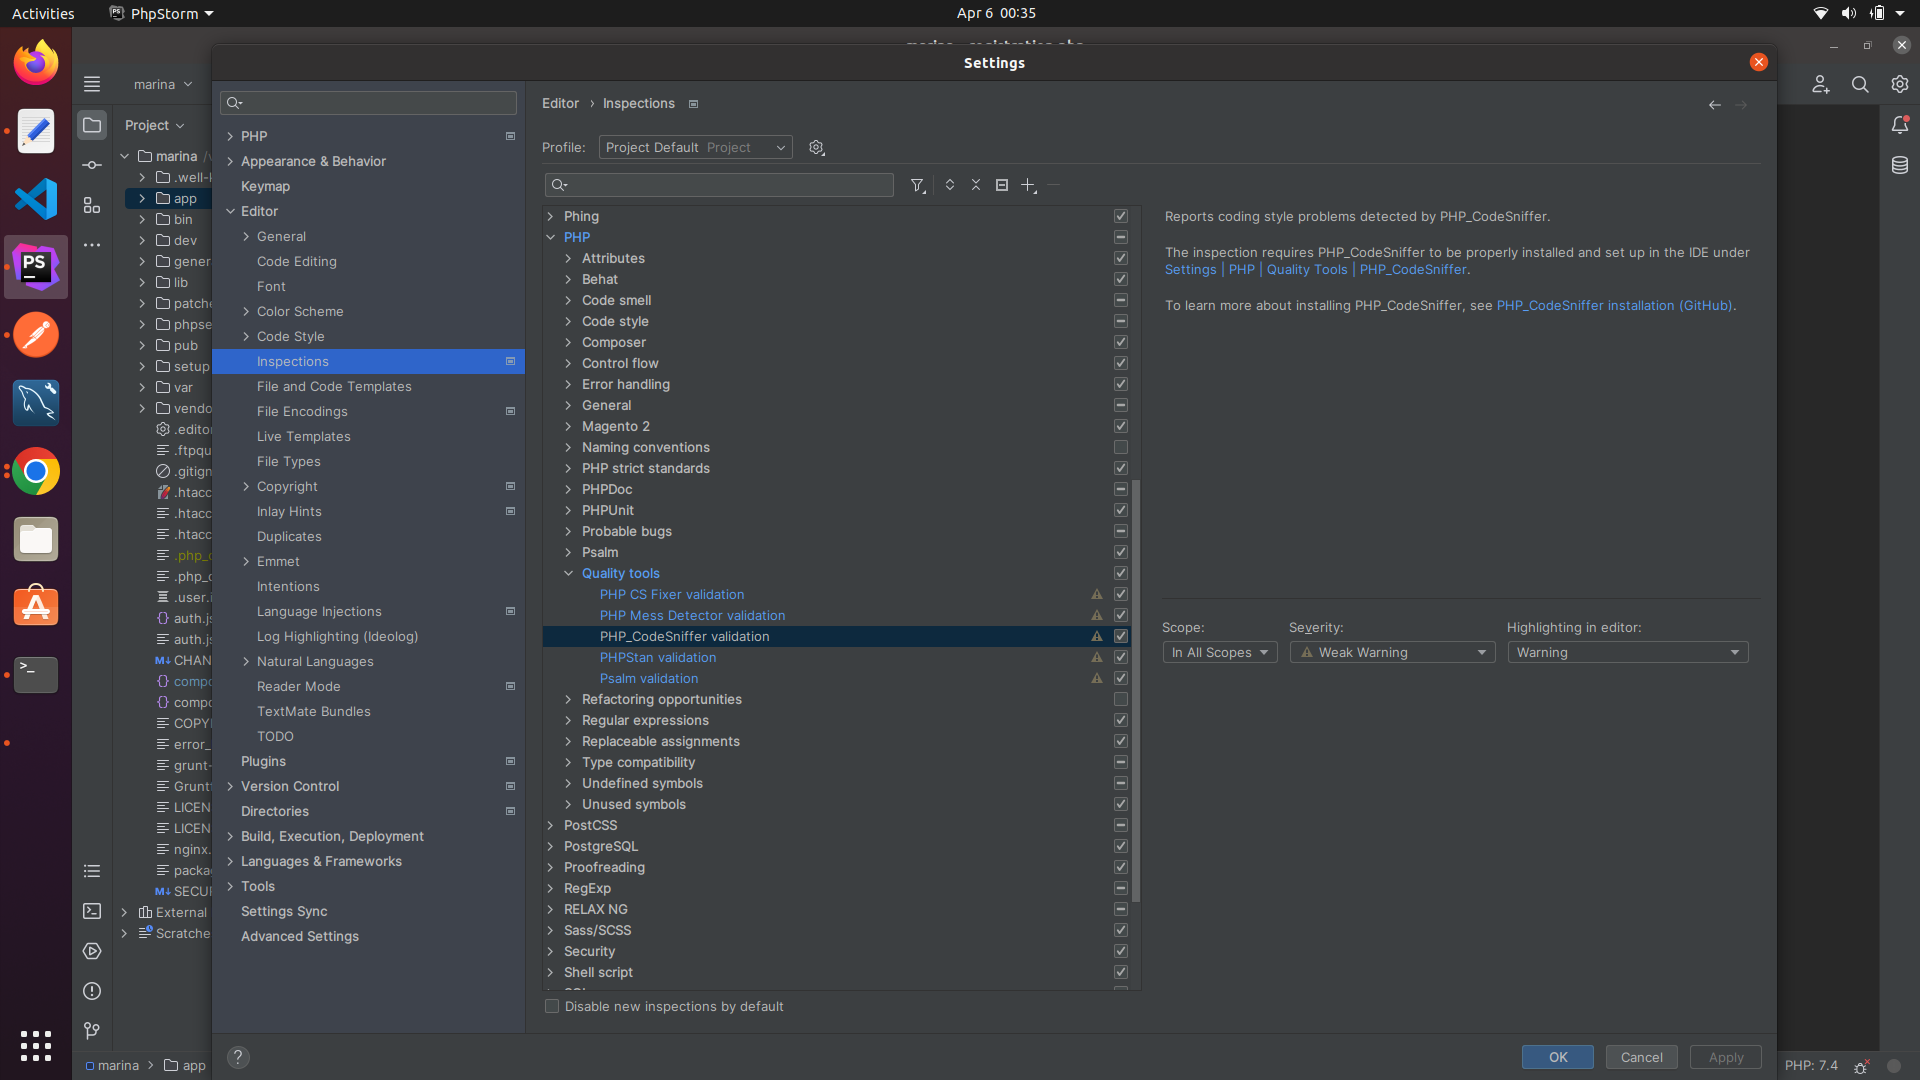
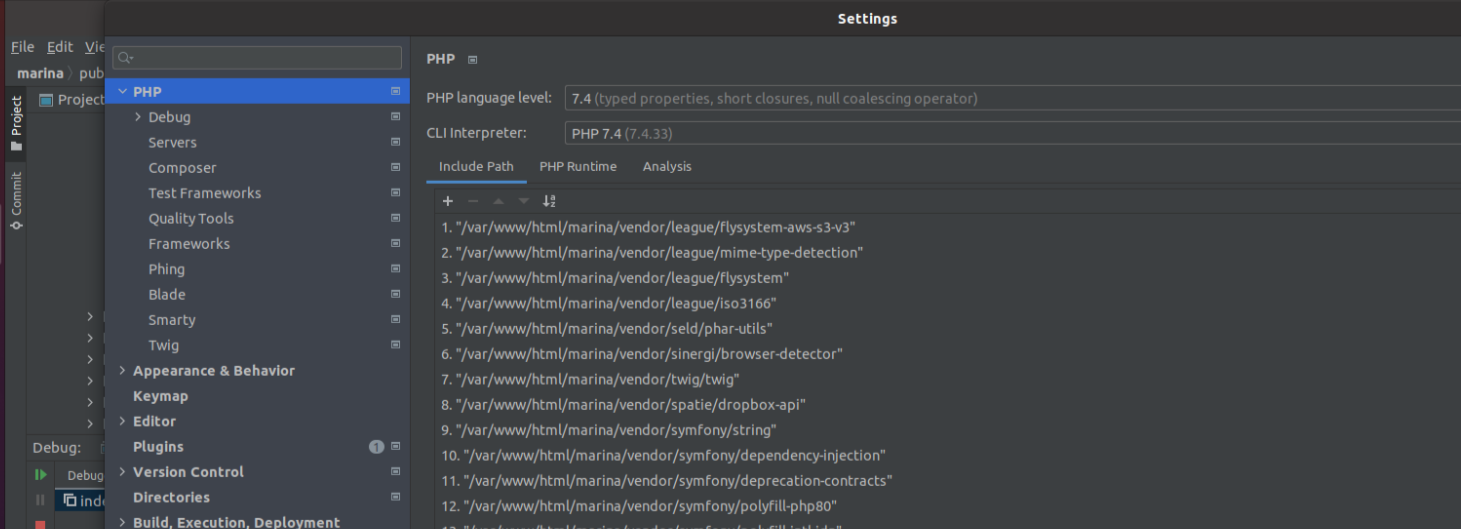
i)
File
|---Settings
|-----PHP
|----- PHP language level -------- already default value will be there
|----- CLI Interpreter -------- choose your php version (PHP 7.4)
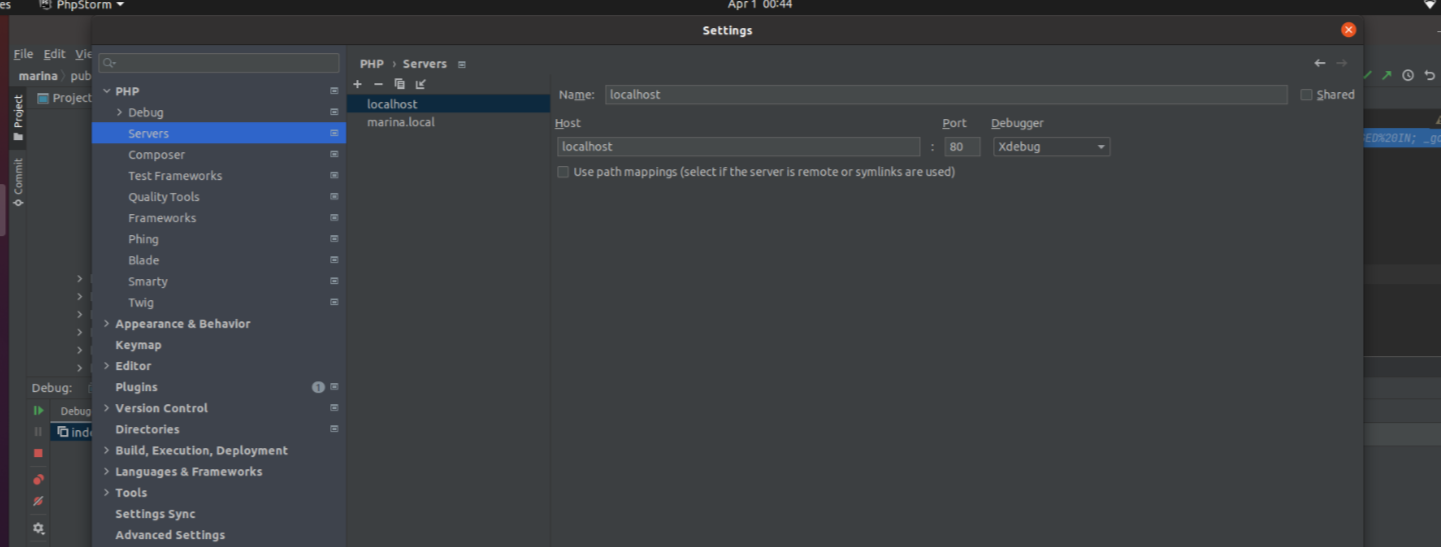
ii) File
|---Settings
|-----PHP
|--- Servers
|---- Click on Add icon (+)
|
|----- Name - value(localhost)
|
|----- Host - value(localhost) Port-value(80) Debugger -value(Xdebug (this value will be there from default))
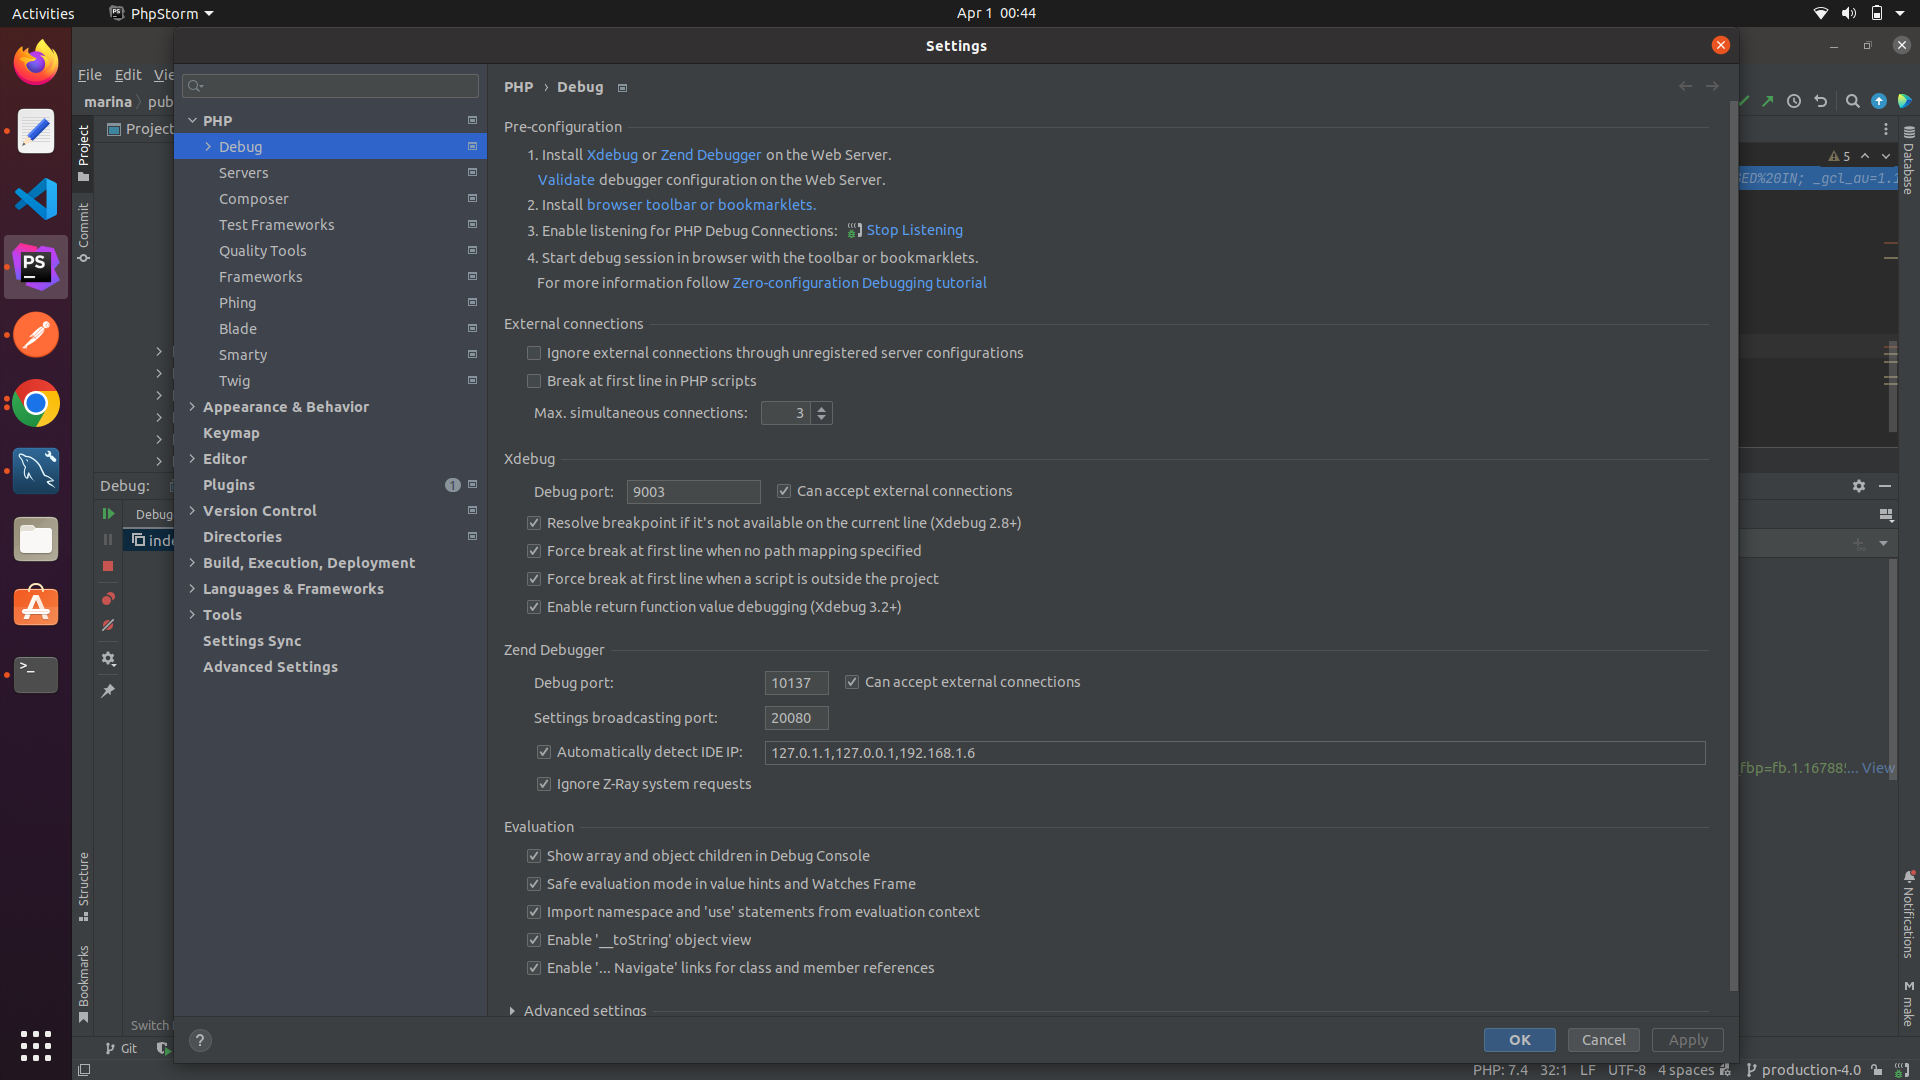
iii) File
|---Settings
|-----PHP
|--- Debug
|
|------- Xdebug
|---- Debug port - value(9003)
iv) File
|---Settings
|-----PHP
|--Debug
|
|--Pre-configuration
|
|--1(on this line number 1 you will show the "validate" word just click on that ) - one Pop-up Dialog box will Open
|
|
Inside Pop-up(Dialog Box)
|
|
Select Local Web Server or Shared Folder (check this option)
|
Inside this selection
|
|--- Path to create validation script : value (/var/www/html/marina)
|--- Url to validation script : value (http://localhost:80/marina)
Step - 7
========
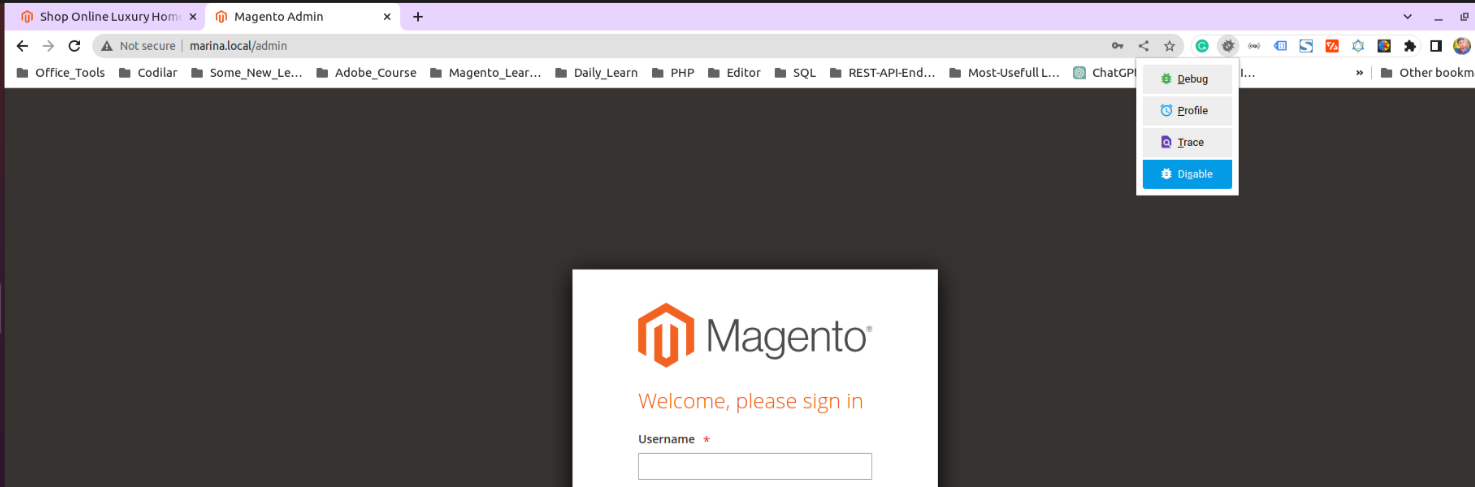
i) Open chrome browser
|
type your url(http://marina.local)
|
|---- Select "Debug" Option from (Xdebug helper extension (if not present install this extension for chrome(Xdebug helper))
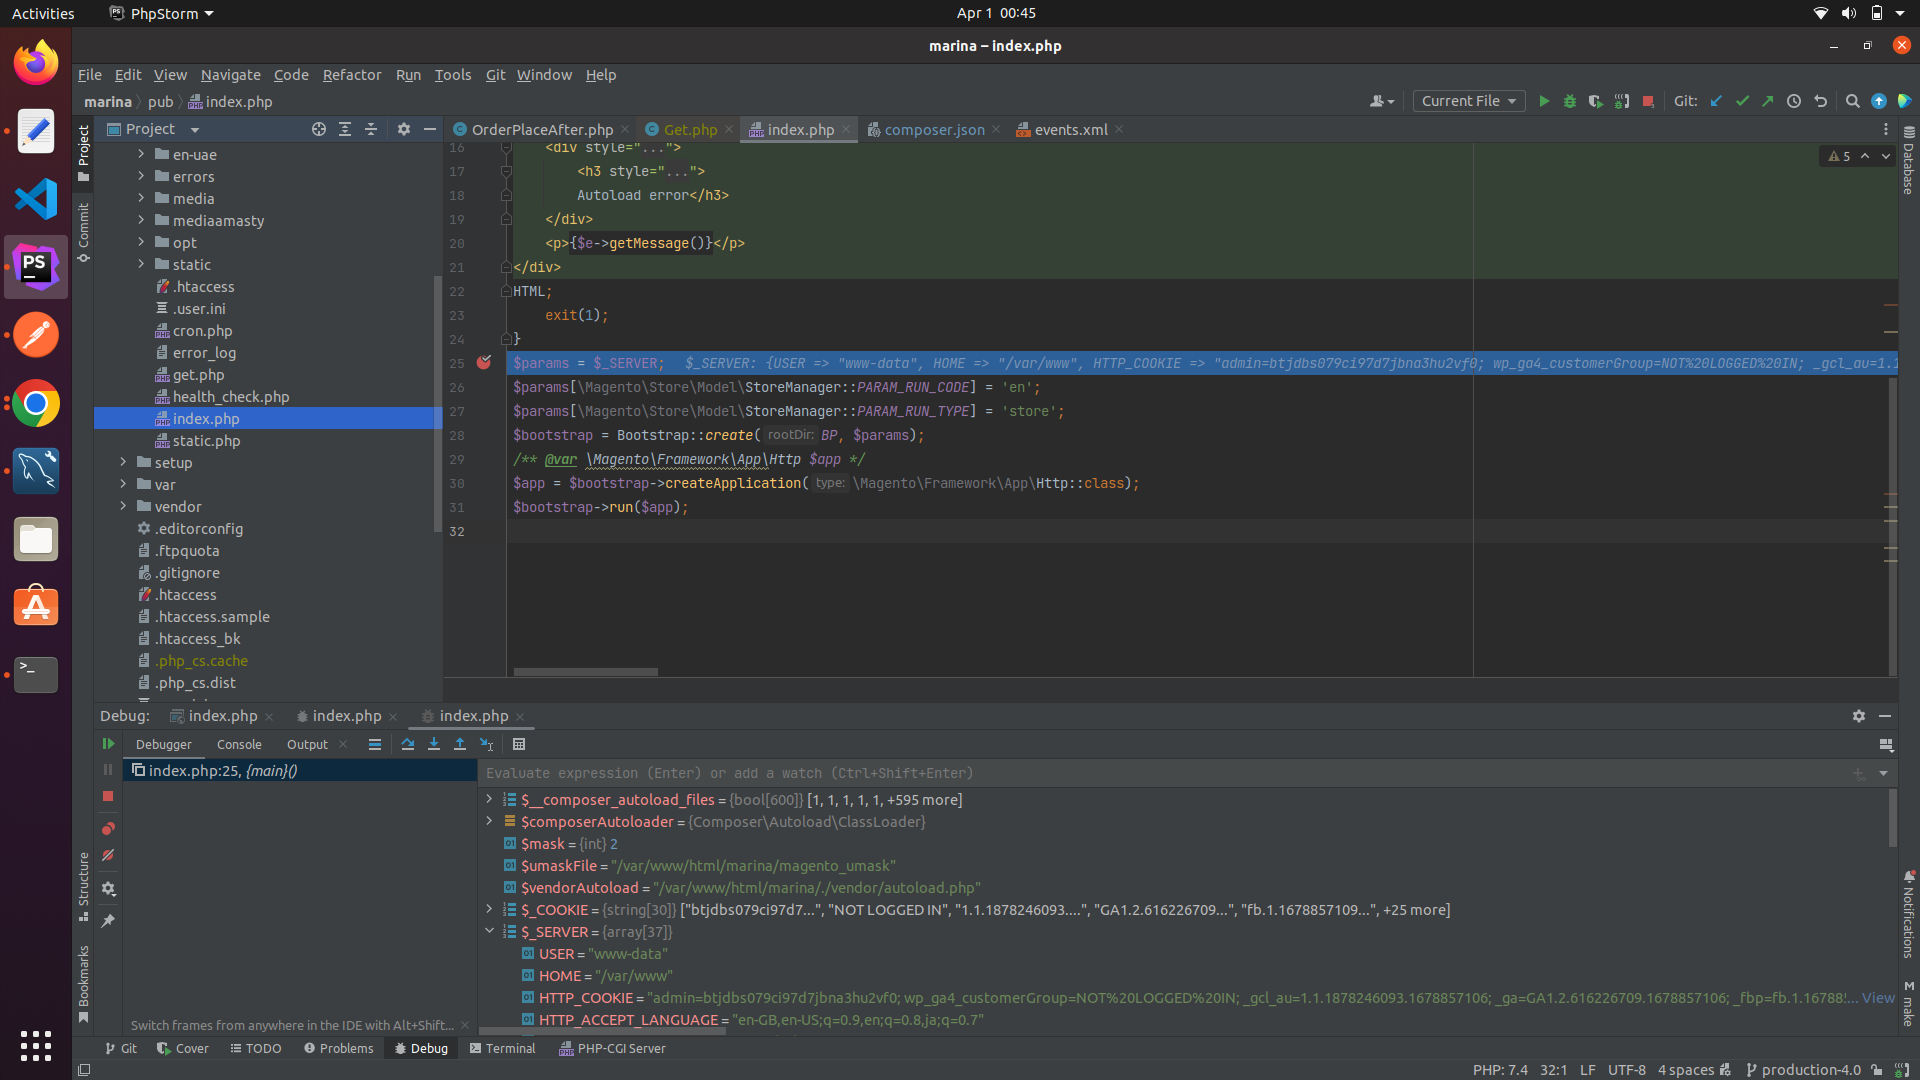
ii) Select Listening button in PhpStrom(you will find it on right side top of phpstrom)
|
|--- when put your cursor on the icon (icon name should be like this - "Start Listening for PHP Debug Connections")
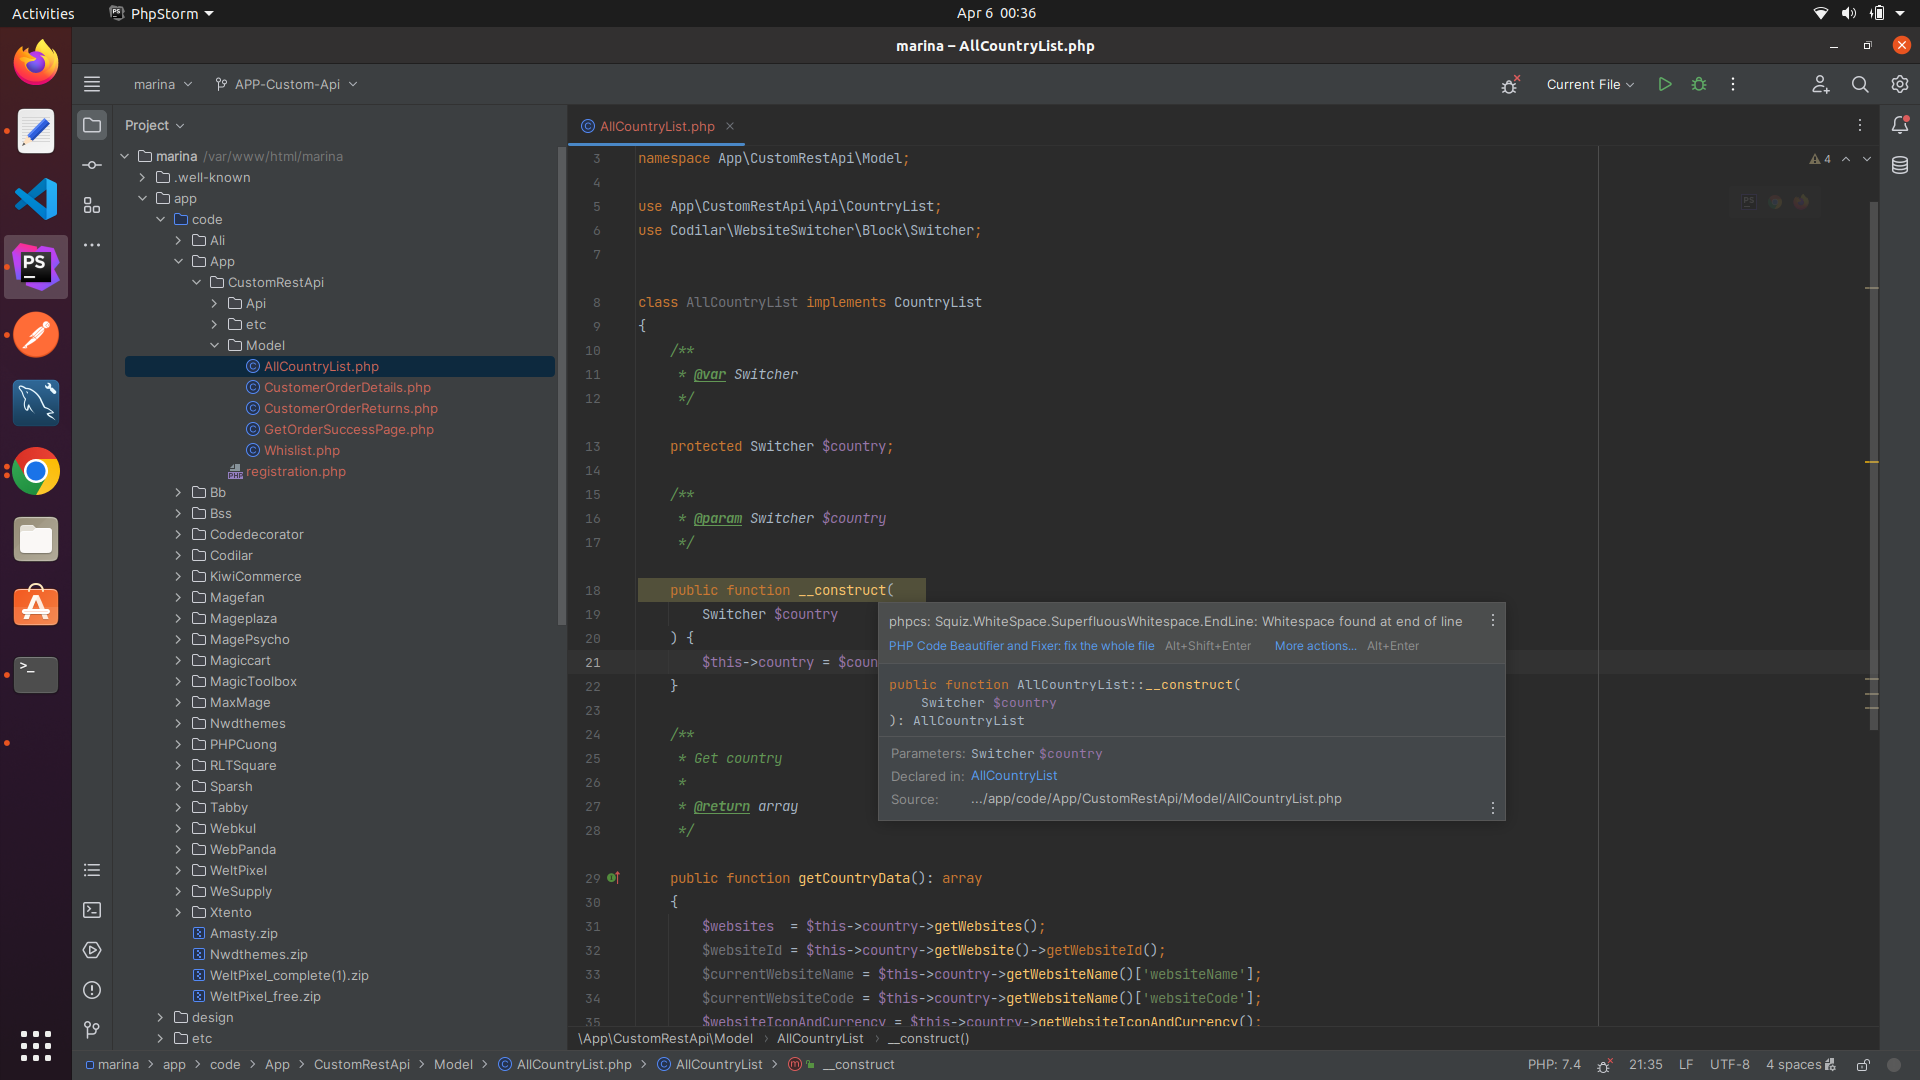
iii) Open the below file
|
|---> /var/www/html/marina/pub/index.php
|
|----- add break point on line number 12
Un-install Xdebugger Completely From Ubuntu
===========================================
sudo apt-get remove php-xdebug
sudo apt-get remove php7.4-xdebug
sudo apt-get purge php-xdebug
sudo apt-get purge php7.4-xdebug
sudo apt-get autoremove
sudo rm /etc/php/<php-version>/mods-available/xdebug.ini
sudo rm /etc/php/8.1/mods-available/xdebug.ini
sudo rm /etc/php/7.4/mods-available/xdebug.ini
sudo rm /etc/php/8.2/mods-available/xdebug.ini
sudo rm /etc/php/7.4/cli/conf.d/*xdebug*
sudo rm -rf /etc/php/8.2/mods-available/xdebug.ini
Install Xdebuger For Php - 8.1
==============================
|
|---------- Same step should be repeat from above but php path will be different
Qucik Command and Hints
=======================
Php Path Location
-----------------
|
|-cd -/etc/php/7.4
| |
| |---------- apache2 cgi cli fpm mods-available - these are the common files you find under this directories
|
|-- cd /usr/lib/php --- to check the (20190902 )
|
|-- cd etc/php/7.4/fpm/conf.d
|
|-- cd etc/php/7.4/fpm
Command For Xdebug (https://xdebug.org/docs/install)
----------------------------------------------------
Basic
|
|------- php -m | grep xdebug --- check if the xdebugger is present in system
|
|------ grep -r "xdebug" /etc/php/ --- find the xdebug.ini file
|
|------ cat /etc/php/7.4/cli/conf.d/20-xdebug.ini ---- add the zend configuration
|
|-----
Un-install
|
|------- sudo apt-get remove php-xdebug ---
|
|------ sudo rm /etc/php/7.4/cli/conf.d/*xdebug*
|
|------
Install Xdebuger For Php - 7.4
==============================
For Php-7.4 Xdebug version =
--------------------------
- /etc/php/7.4/fpm/conf.d
|
|-------
zend_extension="/usr/lib/php/20190902/xdebug.so"
xdebug_mode="debug"
xdebug.client_port=9003
xdebug.start_request="yes"
- /etc/php/7.4/fpm
|
|-----
[xdebug]
zend_extension="/usr/lib/php/20190902/xdebug.so"
xdebug.mode=debug
xdebug.client_host=127.0.0.1
xdebug.client_port=9003
xdebug.start_with_request="yes"


Info
Info
 Step -1

           - Create Git Repo
       - Clone the Git Repo (after clone go to repo directory e.g - Music/repo-name )


 Step -2

           - Go to clone repo directory  (Terminal ---> cd Music/repo-name)

           - Create the React App Inside repo-name
                    --->  npx create-react-app .   (. means it will setup inside the repo-name itself. setup done inside i.e - Music/repo-name)
	            --->  npx create-react-app project-name (project-name  project will be setup inside  - project-name directory i.e - Music/repo-name/project-name)
       - git branch
       - git status
       - git add .  (add all file)
       - git push origin main (first time setup code need to be push to main or master )


 Step -3
           - How to check React Setup is Working on Not (make sure node and npm is already installed in your machine)

		 - If cd Music/repo-name   or Music/repo-name/project-name

			-  npm start
			Starts the development server.

			npm run build
			Bundles the app into static files for production.

			npm test
			Starts the test runner.

			npm run eject
			Removes this tool and copies build dependencies, configuration files
			and scripts into the app directory. If you do this, you can’t go back!

			We suggest that you begin by typing:

			cd /home/sanjay/Documents/gopabandhu_youth_club
			npm start
Info
   Express
   -------
     - cd mkdir server
     - npm init -y
     - npm i express

   NodeMon
   -------
         - no need to start the server again and again
         - npm i nodemon
         - nodemon server.js
Info
   Install intelij IDEs
       --------------------

                - open terminal and run below command

	                   - snap find "intelij"  (it will list all avialable ide version )       -------- here we are installing the snap version

                               - sudo snap install intellij-idea-community --classic                  -------- install the IDES


 Install Eclipse
     ---------------